Build A Network Monitor With Twilio SMS Alerts
Check Your Network’s State At A Glance: Wherever In The World You Are
This tutorial will help you build a simple monitor that shows you the current state of your home or office wireless network, whether you’re nearby or traveling. It uses Twilio’s Programmable SMS API to send text messages to your mobile phone when your network’s state changes, alerting you to outages.
The Net Monitor itself has three LEDs which provide a traffic-light style readout of local network status: green if the Net Monitor is connected or red if it has been disconnected. This might be because WiFi is down or there’s an outage on your broadband connection. When the Net Monitor becomes disconnected it automatically begins to attempt to reconnect periodically: the yellow LED is lit when it’s trying to do so. Once the Net Monitor goes green again, you know you’re good to go.
This is really all the hardware does. It signals its state on the LED and, if necessary, attempts to re-connect when it needs to. In this sense it is a true Internet ‘thing’: it’s just a data source. The real intelligence lies in the part of the Net Monitor application which runs in the cloud as the device’s ‘agent’, which does a number of things:
- Serves a web UI that is accessible from anywhere on the Internet via a browser.
- Uses Twilio to send you an SMS when the your network’s state, as monitored by agent, changes.
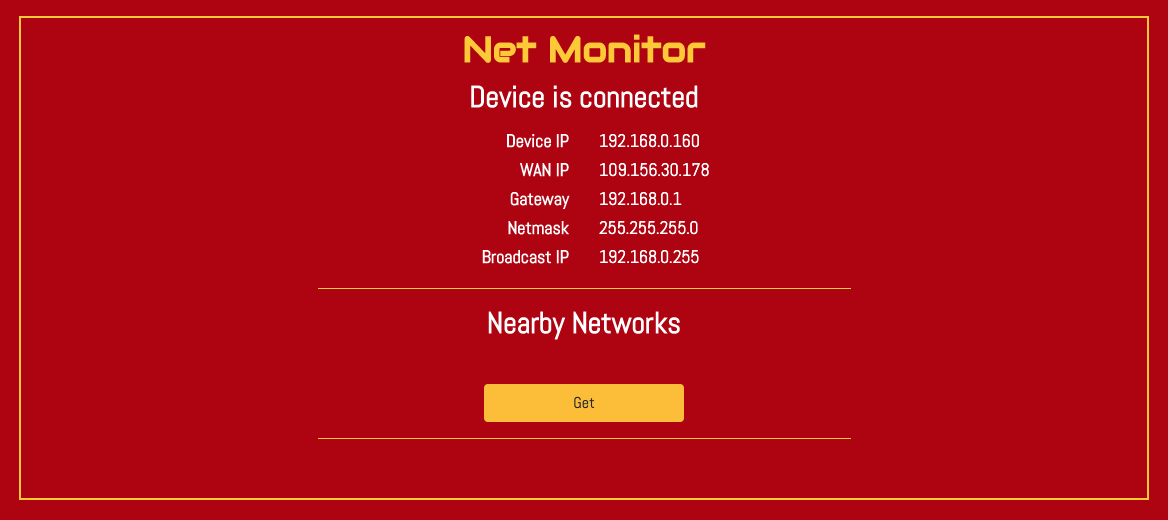
The web UI is dynamic: it auto-updates every 20 seconds with the latest network status information. In addition, it provides a couple of useful tools:
- Click Get to view a list of nearby WiFi networks with which the Net Monitor is compatible. Click Refresh at any time to update the list. Networks’ signal strength as measured by the Net Monitor and their openness are indicated by icons.
Requirements
Hardware
- An Electric Imp imp004m Breakout Board or any other imp-based development board.
- A mini USB cable for power.
- Red, yellow and green LEDs.
- A solder-less breadboard.
- Jumper wires.
- A mobile phone (iOS or Android).
- Your computer.
Other
- An Electric Imp account, which you can create using impCentral™.
- A Twilio account, which you can set up here.
Step 1. Build The Net Monitor
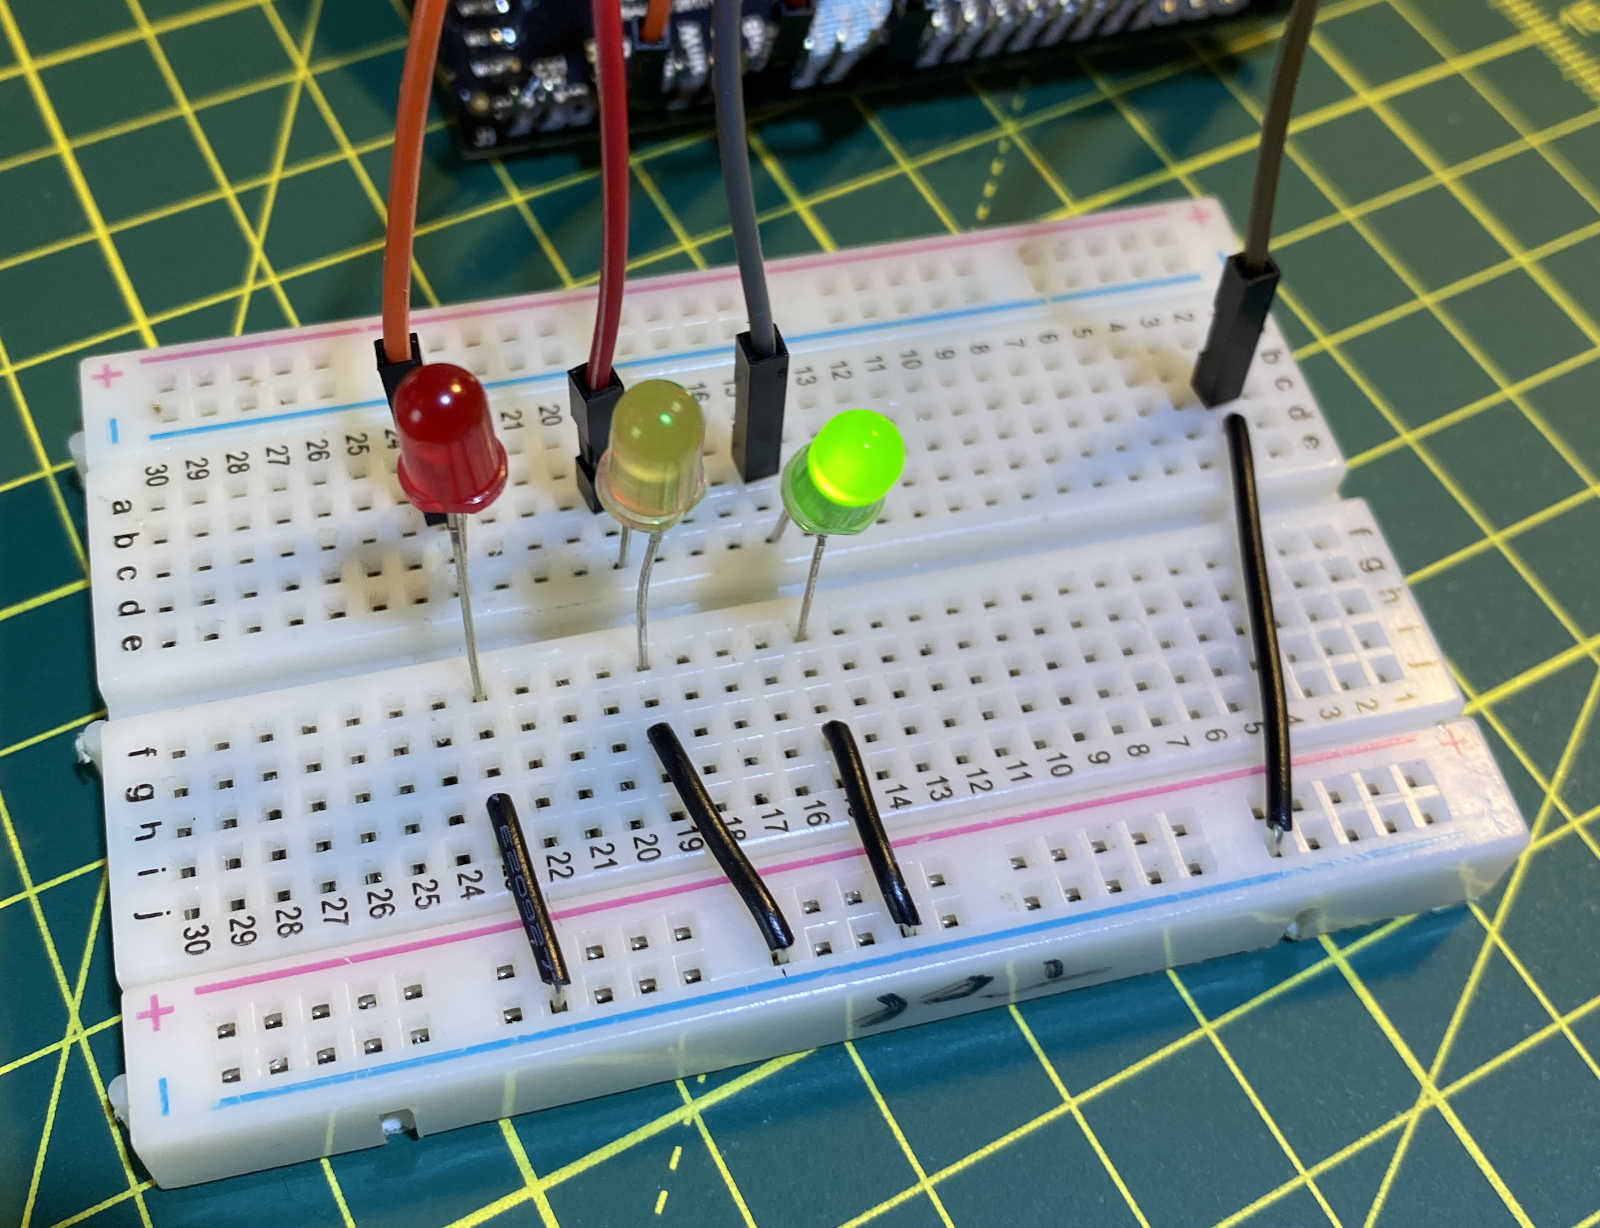
The monitor hardware comprises the imp development board and three LEDs. You may need to solder a strip of connector pins to the board. Plug the board into the breadboard.
For each LED, connect the longer of its two pins to the following development board pins:
| imp004m Breakout Board Pin | LED |
|---|---|
| Pin K | Green |
| Pin B | Yellow |
| Pin N | Red |
Note You will need to select different pins if you are not using the imp004m Breakout Board. You’ll also need to change the device code accordingly, but we’ll do that when shortly, when we look at the code itself.

We’ve kept things simple by not including resistors in the design, but by doing so we’re shortening the lifespan of the LEDs a little. Connecting a small resistor in series with each LED reduces the current flowing through the LED so that it doesn’t burn as brightly. And, as the man said, “The light that burns twice as brightly burns half as long.” We’ll leave it to you to add resistors if you wish.
Finally, using some jumper wires link each LED’s unconnected pin to any of the breadboard’s GND rail and that to the one of development board’s GND pins:

Step 2. Set Up Twilio
- Go to Twilio.com on your computer.
- Part of the signup process includes verifying your personal phone number: this is a security measure that is mandatory before you can try Twilio.
- After you have signed up, you’ll see your project Dashboard. This is where you find your Twilio credentials.
- Twilio gives you a small preloaded balance to test out its functionality. You will not be charged for Twilio phone numbers or usage until you upgrade your account.
- Click Get a Trial Number.
- Click Choose this Number and then Done.
- Keep the Dashboard open in your computer — later on, you’ll need some of the data shown here.
Step 3. Connect The Net Monitor
If you have used your imp-based development board before, it will already be registered with your Electric Imp account, so you just need to re-assign it to the new Product and Development Device Group that we’ll set up in the next step.
If you are new to the Electric Imp platform, you will need to add your Net Monitor to your account. To do so, you will need to download the Electric Imp mobile app to your phone from either the Google Play Store or the Apple App Store, depending on the type of phone you own.
When that’s done, open the app.
If you have an Electric Imp account already, just sign in. Otherwise you will need to open impCentral in a browser on your computer: - Under Sign Up, enter an email address and click the Sign Up button. - You will receive a verification email to which you will need to respond: click Complete Signup to return to impCentral to enter some information about yourself and to activate your account. - Once you’re done, use your new account details to sign into the mobile app.
In the mobile app, tap CONFIGURE A DEVICE and then WiFi. Now enter your local network’s name and password. Flip the Save Network Settings switch so that you won’t have to enter these again. Tap NEXT.


Connect your Net Monitor to power. You can use an AC USB adaptor (recommended) or a USB port on your computer. If you choose the latter, only power is used; the Net Monitor does not communicate over USB so you won’t see it shown as a connected device.
The Net Monitor’s BlinkUp™ status LED will begin flashing. Tap NEXT in the mobile app and then START BLINKUP. Quickly place the phone’s screen face down over the flashing LED. After a three-second countdown which begins when you tapped START BLINKUP, the phone screen will flash to transmit your WiFi details to the Net Monitor. Once this is done, the phone will vibrate.

Always run BlinkUp with the screen facing away from you and towards the device being configured, especially if you suffer from a medical condition that makes you susceptible to strobing light. The app has a three-second countdown before BlinkUp starts, so you have time to place the phone and look away or close your eyes. The handset will vibrate when BlinkUp is done.
Move your phone away. If you’re quick, you’ll see the status light stay green for three seconds. It will then begin to flash through various combinations of red and orange as the Net Monitor connects to WiFi and the Electric Imp impCloud™. Shortly, the LED will flash green slowly — it has connected:

In a few minutes more, the LED will go out to save power.
If you see any other color flashing consistently, you know that the device did not connect. You may have made an error in your WiFi settings, or perhaps you didn’t place the phone over the device quickly enough or closely enough. Just try BlinkUp once more. If you’re still having problems getting the Net Monitor online, there is a dedicated BlinkUp troubleshooting guide to help you.
Step 4. Program The Net Monitor
If you haven’t signed in to impCentral on your computer, please do so now.
If this is your very first time using impCentral, you’ll be presented with a wizard that can guide you through setting up your first Product and Development Device Group. Follow this wizard’s guidance now, and use the Product and Device Group names used below.

Alternatively, just close the wizard (click the X at the panel’s top right corner) and follow the next steps.
- Create a Product and a Development Device Group:
- Click Create New Product.
- Products are impCentral projects: they encompass everything you need to establish, develop and manage an IoT product.
- Device Groups organize devices into collections. Every device in a given Device Group runs the same application code.
- Enter
Net Monitorfor the Product’s name, andMonitorsfor the Development Device Group name. - Click Create.
- Click Create New Product.
- Add your Net Monitor to the Development Device Group:
- impCentral will now present the “Monitors” group’s code editor:
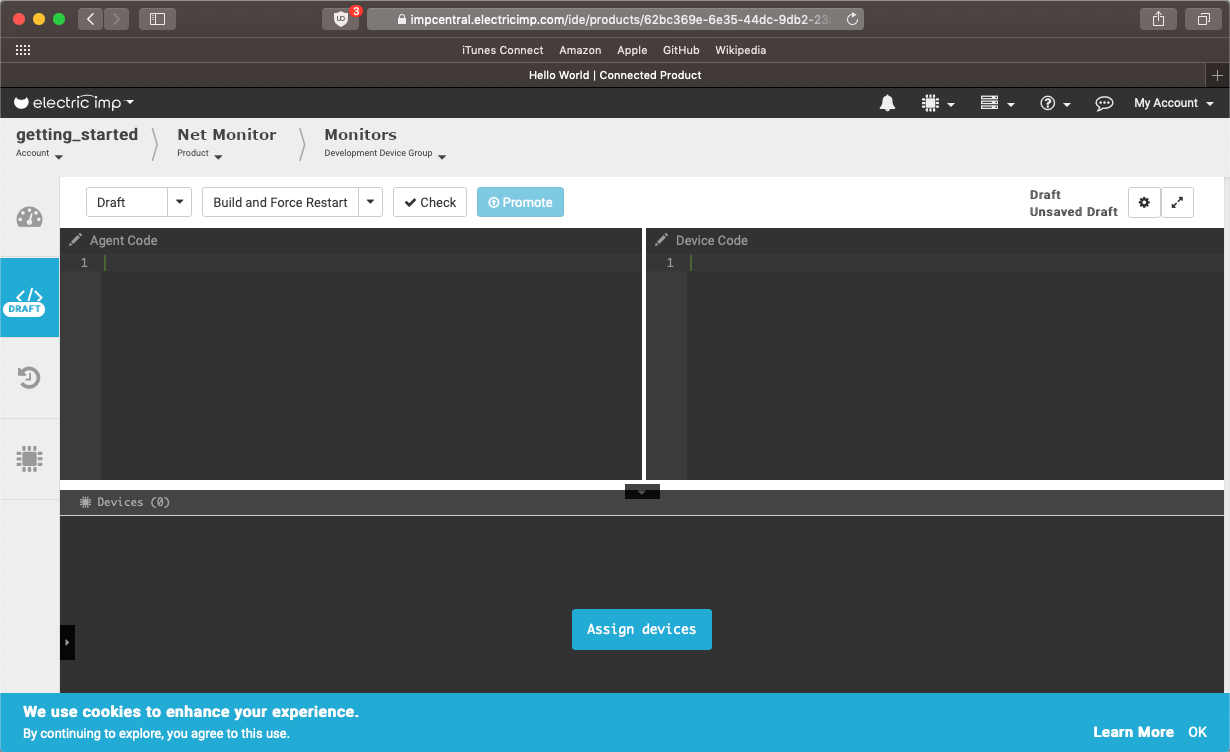
- The code editor has three panes:
- Agent Code — this is where you write and edit code that will be run by the device’s cloud-hosted partner.
- Device Code — this is where you write and edit code that will be run by the device itself.
- Devices — this lists the devices assigned to group (none yet) and shows log messages from a selected device.
- The code editor has three panes:
- Click Assign Devices
- A panel will appear listing your devices. You should see just one: your Net Monitor, identified by its unique Device ID.
- Check the box to the left of the device’s listing.
- Click Assign.
- impCentral will now present the “Monitors” group’s code editor:
- Enter the application code:
- You can find the code you need in our GitHub repo.
- There are two sections, one for device code, the other for agent code.
- Configure the application code:
- If you are not using the imp004m Breakout Board, change lines 288-290 of the device code to match the pins you have used to drive the three LEDs.
- In line 332 of the agent code, enter your Twilio application credentials: replace the named data with your own values:
- Your Account SID is shown on your Twilio project dashboard.
- Your Auth Token is also accessed from the dashboard: click view next to its name and then select and copy the token.
- Your Twilio Phone Number is shown on your project dashboard under Trial Number.
- In line 333 enter your own mobile phone number (the one you verified during setup) in the form
+[country code][area code][number], eg.+11234567890.
- Deploy the application code:
- Click Build and Force Restart to run the program.
What The Code Does
How do the two parts of the Net Monitor code come together to form a cohesive application? Let’s look at the device code first.
Device Code
The first section (line 22 through 281) is third-party library code: a disconnection manager that deals with unexpected device disconnections — for example when your broadband connection goes down — by scheduling reconnection attempts on a regular basis. It communicates with the host application by triggering a special function named a ‘callback’ when disconnection and reconnection events take place. The application provides this callback, which is registered with the library code in line 311.
The device code configures and initializes the three LEDs, each identified by a variable named for the LED’s color. Lines 288-290 set these variables to reference the imp pins to which the LEDs are connected; changing the value written to these pins turns the LED on (value 1) or off (value 0), and this is done in response to messages from the disconnection handler in lines 311-341.
Line 345 starts the disconnection manager when the app itself boots.
Lines 350 and 363 register two callback functions which will be triggered if and when the agent sends the device the named messages:
get.wifi.datais sent when the web UI requires local network information from the agent. This information is collected by the callback and returned to the agent.get.wlan.listis sent when the web UI has been asked to show a list of nearby WiFi networks. The device is instructed to perform a network scan. This has a callback of its own, triggered when the scan is complete and which sends the list of networks back to the agent.
The Agent Code
The agent code hosts a UI which is served in response to requests from web browsers. The code for the UI lies between lines 15 and 247; this is the UI’s HTML and JavaScript. The UI contains images which are stored in code in lines 254 through 262. The agent has no file system, so non-text media need to be stored as binary data within the application code.
Lines 283 through 323 are functions which will be called by the application as it runs. The application proper starts on line 332: we configure the Twilio library code.
Lines 339 through 353 set up handlers and register them to be triggered on the arrival of named messages from the device. The device code section discusses the source of these messages: if a device is to send a message to the agent, a device code agent.send() call (the message source) must be accompanied by a device.on() call (the message receiver) in the agent code. Likewise, if an agent is to send a message to the device, a device code device.send() call must be accompanied by an agent.on() call in the device code.
Line 358 sets up the agent-hosted API through which an instance of the web UI running in a browser communicates. This process is simplified by using the Rocky library, which is loaded in line 6. Lines 365 through 438 register handlers which Rocky will call in response to incoming HTTP requests from the browser, including the initial request for the UI web page and subsequent requests for images and device-status details. The handlers typically respond by returning the requested data; the UI's JavaScript (using JQuery) processes this data and presents it on screen.
Line 443 calls the function watchdog(). This is located in lines 307-323 and is automatically executed every 15 seconds to check the device connection state. You can change the loop period by altering the value in line 322. Device connection state changes trigger SMS messages via Twilio.
Like Rocky, Twilio messaging is simplified by the use of an existing integration. This is loaded in line 9 and, as we saw above, initialized in line 324. The statement at lines 316 sends an SMS notification to the target phone number.
Step 5. Use The Net Monitor
You’ll see the Net Monitor in front of you signalling its connection status — and therefore the status of its local network. Try turning off your router to see what happens. After at most one minute, the Net Monitor will detect the loss of connectivity and signal this with a red light; 60 seconds later it will also light the yellow LED to indicate it is attempting to connect. If it fails to do so, it will turn the yellow LED off again.
When the agent discovers that it is no longer connected to the device, you will receive a text message.
Restart your router. Eventually, once the router is up and running with a broadband connection made and its wireless network back in place, the Net Monitor will reconnect; the red and yellow lights will go off and the green light will come on.
Every agent has its own, unique URL on which it can be contacted across the Internet. This URL is shown in impCentral. In the code editor, click on your device listing in the Log pane and its agent URL will appear above the log area on the right. It will look something like https://agent.electricimp.com/1234567. Click on this address to open it in the browser on your computer. You will see the web UI. The requests the browser makes will appear in the impCentral log.
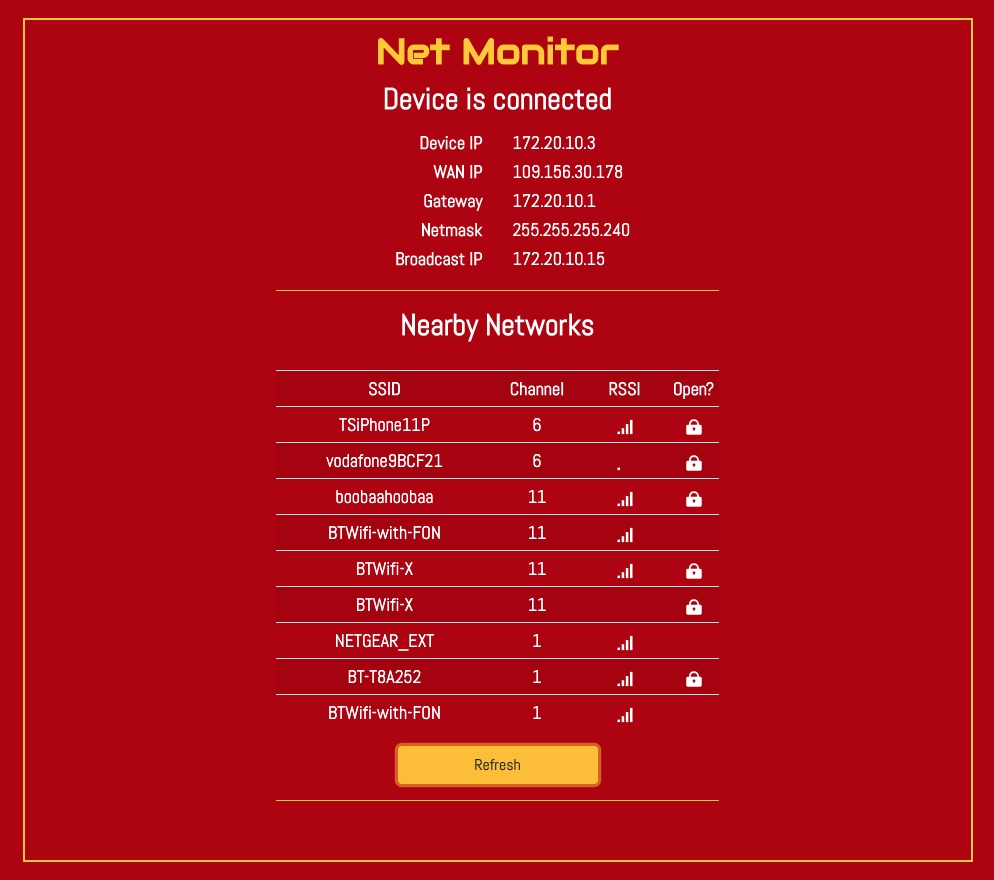
In the UI, tap Get. After a couple of seconds, the UI will show a list of nearby WiFi networks. Again, you can view the two-way conversation between browser/UI and agent in the log.
Where Next?
Now that you have built your Twilio- and imp-enabled network monitor, here are some suggestions for what you might do next.
- Use Twilio’s Programmable Voice technology to call your phone and speak out the network status report.
- Update the net monitor’s web UI code to sort the nearby network list by clicking on column headers.
- Work with some of our other sample applications.