How To Build A Smart Fridge With Electric Imp and Salesforce
A Smart Sensing Application For Asset Monitoring
A revised version of this tutorial can be found here. The following guide is now archived and may no longer match current software interfaces
Introduction
Asset Monitoring is an important horizontal solution for IoT. This project is an example of a retrofit Asset Monitoring use-case using an Electric Imp-powered device and the Electric Imp IoT Connectivity Platform. In this example, the asset you are monitoring is a refrigerator—integrating current temperature, humidity, and fridge door status information with Salesforce IoT. You analyze real-time data with Salesforce to detect anomalous conditions and create business processes within your Salesforce organization.
The project can be completed using one of two Electric Imp–powered devices: the impExplorer™ Kit or the Battery Powered Sensor Node (BPSN). Whichever of these devices you use, it reads temperature and humidity data from its onboard sensors, and sends those readings to Salesforce IoT using Platform Events. The device also senses light and uses this to determine whether the fridge door is open (bright light) or closed (no light). The light-level reading is also sent to Salesforce using Salesforce IoT Platform Events.

Because the Electric Imp Platform abstracts away the underlying hardware, the same software can run on both devices. The majority of IoT projects start with a PoC and eventually move to a production-grade product. Electric Imp’s technology makes that migration seamless. By moving from prototype to mass deployment on the same underlying platform, you can minimize complexity, risk, cost and time to market.
Salesforce stores the incoming data and opens a Case using IoT Explorer Orchestration if one of the following occurs:
- The refrigerator door is open for longer than a predefined period.
- The temperature rises above a predefined threshold.
- The relative humidity rises above a predefined threshold.
Each of these thresholds will be defined later when you set up the IoT Explorer Orchestration.
Note 1 Salesforce has two different desktop user interfaces: Lightning Experience and Salesforce Classic. This project is designed for Lightning Experience. You can learn about switching between interfaces, enabling Lightning Experience and more in the Lightning Experience Basics module on the Salesforce Trailhead website.
Note 2 In the following tutorial, text in bold typically indicates an user-interface element, such as a web page section, a button or an option you select from a list. Text in code form indicates information you need to type into a web page or app.
Step 1: What You Need
- General
- Your Wi-Fi network name (SSID) and password.
- A smartphone (iOS or Android).
- A computer with a web browser.
- Accounts
- A free Electric Imp developer account.
- The Electric Imp mobile app (iOS or Android).
- A [Salesforce Developer Edition(https://developer.salesforce.com/signup)] account.
- Hardware
- An Electric Imp impExplorer Kit or a Battery Powered Sensor Node.
- Three AA batteries (to run the board from inside a fridge).
Step 2: Set Up The Hardware
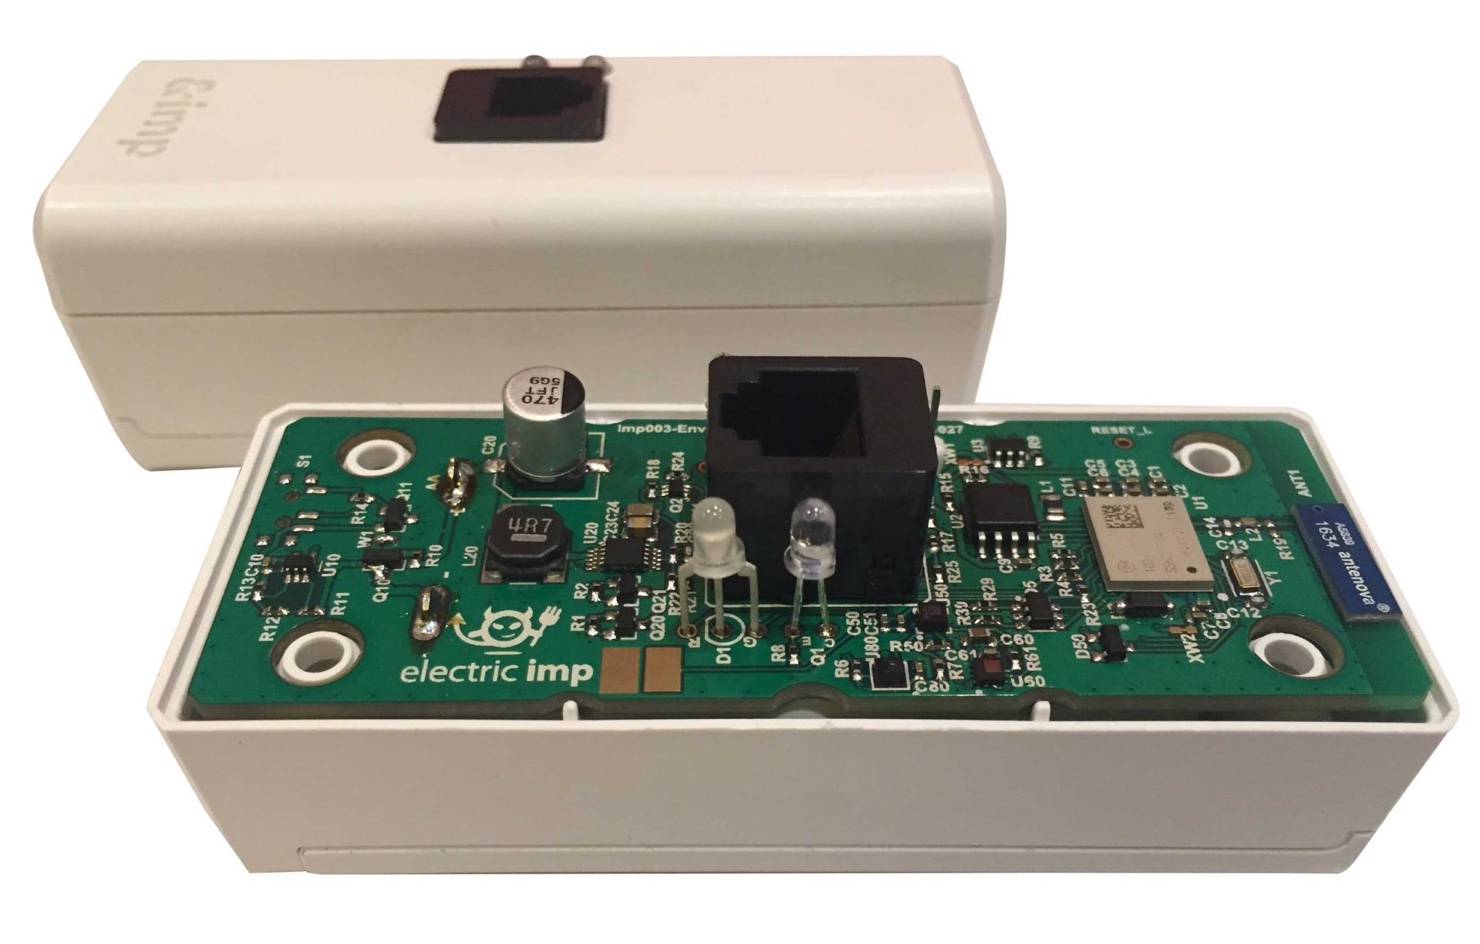
If you are using an impExplorer Kit
First we need to assemble the impExplorer Kit. The Kit comes with these components:
- An imp001 card, which contains a Wi-Fi radio and the microcontroller in an SD card form-factor, that drives all the logic for the board.
- The impExplorer board into which the card is plugged.
Now set up the hardware:
- Plug the imp001 card into the card slot on the impExplorer.
- Power up your impExplorer Kit with the provided mini-B USB cable or the AA batteries.
- The imp001 should now have power and be blinking amber (or red if it has been used before).
Assembled, it should look like this:

If you are using a Battery Powered Sensor Node
- Open the case, insert two batteries and ensure the power switch is on.
- Close the case.
- The led on the front should now have power and be blinking amber (or red if it has been used before).
Assembled, it should look like this:
Electric Imp BlinkUp
A challenge for connected products is being able to securely provision a device to a network without a user interface to enter credentials on the device. To solve this problem, Electric Imp uses an optical provisioning process called BlinkUp™, which securely provides a device with Wi-Fi access credentials and authenticates and enrolls it into the Electric Imp impCloud™ in a single step. This is done via the Electric Imp mobile developer app for this project and for other PoCs and prototypes. For production-level products, the BlinkUp functionality can be incorporated as an SDK in a customer’s mobile application or via JavaScript in a web browser.
You will need to use BlinkUp to add your device to your Electric Imp account:
- Launch the mobile app.
- Sign in to your Electric Imp account.
- At the main menu, tap CONFIGURE A DEVICE.
- Select WiFi.
- Enter your WiFi network credentials then tap NEXT.
- Follow the instructions in the app to activate your device.
- After a successful BlinkUp, the app will show you your Electric Imp Device’s unique device ID. You will need this later.
Note When you enter your WiFi details, the app may set the Network Name field for you. It will enter the name of the network your phone or tablet is connected to. This may not be the one you wish to connect your impExplorer to; if not, just tap on the name to key in the correct SSID.
The impExplorer or BPSN needs to connect to a 2.4GHz 802.11n Wi-Fi network, so you will need to make sure one is available. This is especially the case if your phone is connected to a 5GHz network as the impExplorer or BPSN will not be able to connect to this. You may need to set up a separate or guest network to try this example. If in doubt, consult your network manager.
If you have any issues getting started with your Electric Imp account or device, please follow Steps 1 through 7 in the Getting Started guide.
The Electric Imp Platform
What differentiates Electric Imp from traditional IoT approaches is that all components and services of a solution are designed, integrated and managed together.
The Electric Imp IoT solution starts with the purpose-built impOS™, which provides secure cloud connectivity services to products, enabling users to concentrate on creating code to bring their products’ functions to life.
impOS runs on an imp-Authorized module, which ensures silicon-level hardened security. The imp-authorized module is placed inside a device, component, or product and provides a powerful local compute capability and connections to application-specific sensors and actuators. The module also provides local intelligence and IP-based cloud connectivity via Wi-Fi, ethernet or cellular. The module is not manufactured or sold by Electric Imp, but instead available through Electric Imp’s hardware distribution partners.
The impModule connects securely to the impCloud agent, which is a fully programmable middleware. The impCloud agent enables custom in-flight data processing and integrations to the customer’s downstream cloud data and application services. This unique architecture delivers the flexibility necessary for real-world IoT solutions and is what makes scaling solutions effortless and automatic. The impCloud agent operate as the device’s front end to the Internet. It securely connects to Salesforce IoT via a high-performance cloud-to-cloud REST integration, letting you easily push data to and take commands from Platform Events. In this example, the agent code receives data from the device and forwards it to Salesforce as a Platform Event, as the following diagram shows.
Salesforce Smart Refrigerator Device Code
When application code is deployed via the Electric Imp online development environment, impCentral™, to the device, impOS automatically restarts the device code and establishes a secure, managed connection to its paired agent. At a high level, the device code performs the following functions:
- Turns on the impOS power-save functionality to reduce battery use.
- Initializes the temperature and humidity sensors (the light sensor is already initialized by impOS when the device boots).
- Starts a timer to fire events every READING_INTERVAL_SEC seconds.
- On every timer event:
- Read the temperature sensor value.
- Read the humidity sensor value.
- Determine if door is open (based on light sensor above threshold).
- Send a message (with values for temperature, humidity, door open state) to the paired agent.
- Repeat #4 until new code is deployed or the device is powered off.
Salesforce Smart Refrigerator Agent Code
When the code is deployed via impCentral to the agent container, the agent code is restarted and connects to its paired device over a secure, managed connection. At a high level, the agent code performs the following functions:
- Includes the prebuilt Salesforce library for easy integration with the Salesforce Cloud.
- Authenticates with the Salesforce Cloud Smart Fridge Application using the CONSUMER_KEY and CONSUMER_SECRET values.
- Registers a handler to receive messages from the device.
- On every received message from the device:
- Read the message values (temperature, humidity, door open).
- Create a platform event containing the device ID, timestamp, doorOpen flag, temperature and humidity values.
- Send the platform event to Salesforce via the Salesforce integration library.
- Repeat #4 until new code is deployed.
Step 3. Enter Device And Agent Code
Electric Imp applications are developed and managed in an online tool called impCentral. This web app provides all the facilities you need to write and deploy the software over the air to the device and to the agent that controls your imp-enabled connected product. impCentral also provides the tools for managing your connected devices once they have been deployed in the field, including deploying software to beta test groups, ensuring device operation isn’t interrupted by a deploy, and the ability to remotely diagnose issues from anywhere in the world. For more details on impCentral, see Introduction to impCentral
Create a Product
- In your favorite web browser log in to impCentral.
- Click Create A Product:
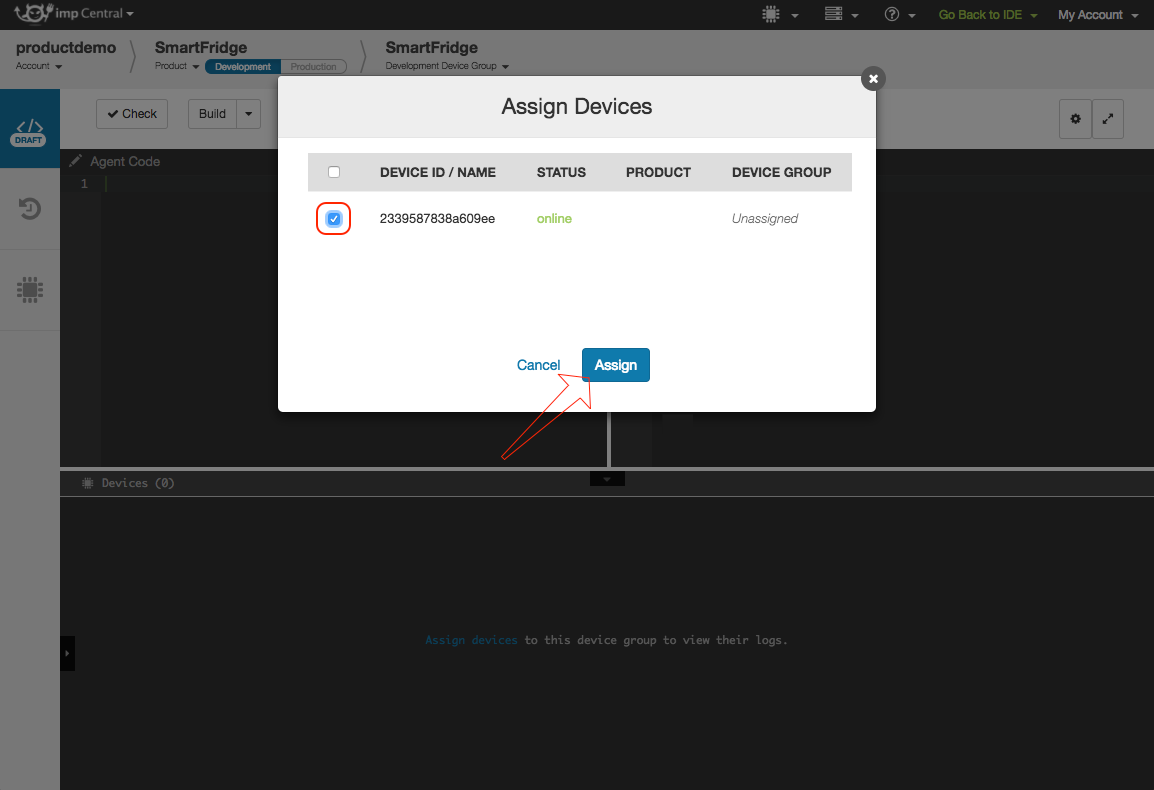
- In the popup, enter a Product name (for example, SmartFridge), a Development Device Group name (for example, SmartFridge), and then click Create:

- A Product defines a new connected product in the Electric Imp impCloud. A Device Group is the place where you develop and test your application software, both the device code and the agent code. There can be one or many Device Groups per product, for example a beta test group. You can assign one or many devices to a Device Group and when a new code update is deployed, it is sent over the air to all devices assigned to the Device Group.
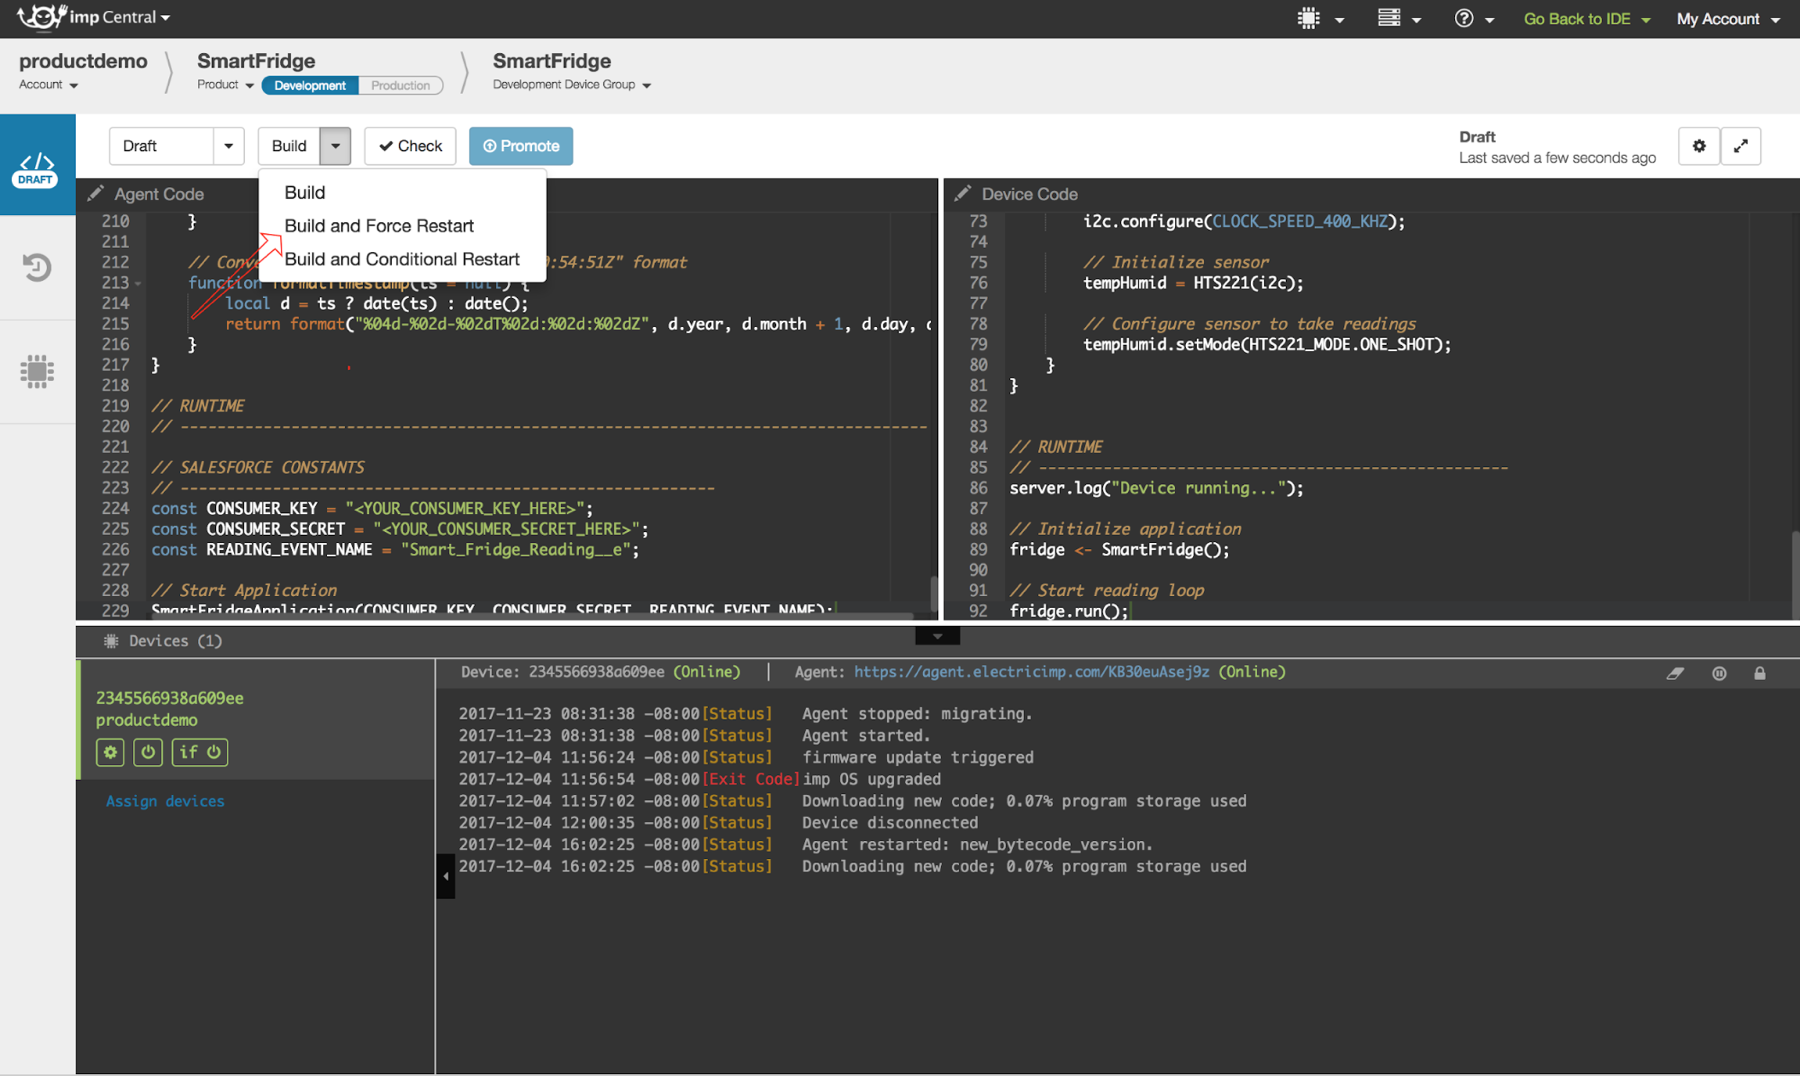
- Copy and paste the agent code from GitHub into the left-hand windowpane as shown in the image.
- Copy and paste the device code from GitHub into the right-hand windowpane as shown in the image.
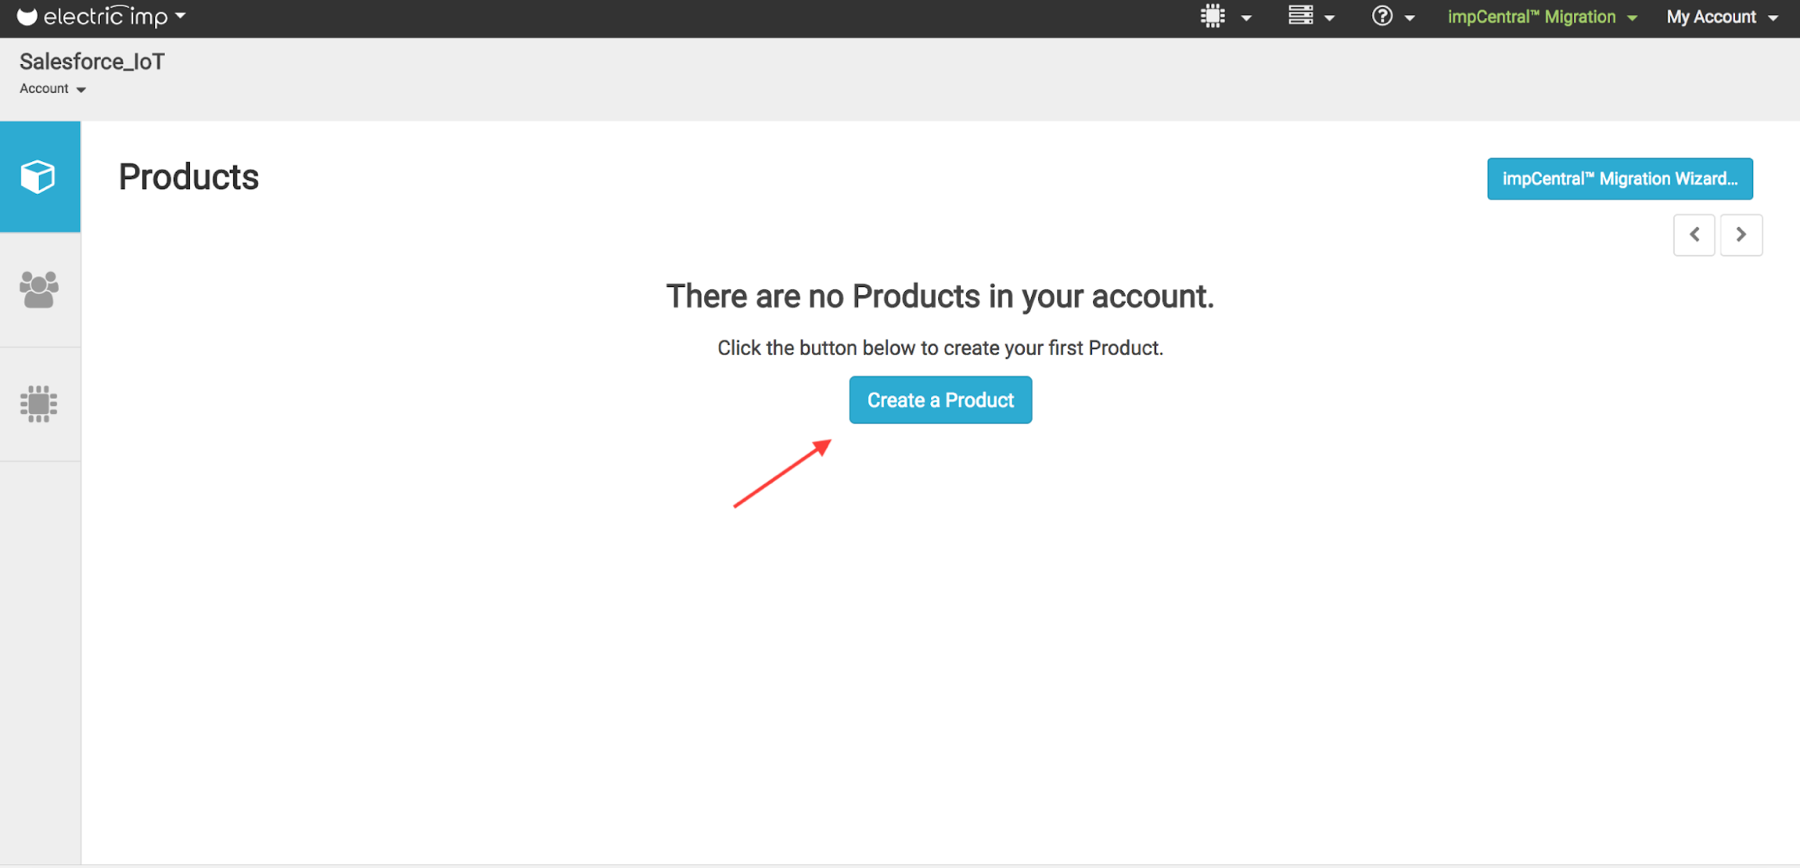
- Click Assign devices:

- In the Assign Devices popup, locate your device by its ID, select the device, and click Assign:
- At the top of the logs pane you can find the agent URL of your device. It will look something like this: https://agent.electricimp.com/szPc0sLfAqlu. Make a note of the agent URL — you will need it when you create your connected app in Salesforce:

- Leave impCentral open in your browser—you return to it later.
Salesforce IoT Explorer
The data received from the device may be processed, stored and analyzed within Salesforce, and used to trigger business processes and workflows. This example demonstrates just a few of the many capabilities of combining Salesforce IoT with customer context. It can easily be modified and extended to meet your particular business use case.
In this example, you create the following Salesforce entities:
- Connected Application (Step 4) — Authenticates the imp application in Salesforce so that Platform Events sent by the imp application are accepted by Salesforce.
- Custom Object (Step 5) — Stores the data received from the device so that the historical data can be monitored, for example using the Salesforce mobile app.
- Platform Event (Step 6) — Transfers the data from the device to Salesforce. A Platform Event Trigger inserts the received data into the Custom Object.
- IoT Explorer Context (Step 7) — Lets you set up IoT Explorer Orchestration and enables your device to access resources within Salesforce.
- Custom Case Field (Step 8) — Opens customized Cases: a standard Case object with an additional field, the device ID.
- IoT Explorer Orchestration (Step 9) — Defines a fridge state machine that reacts to incoming Platform Events and opens Cases as required.
- Custom Object Tab (Step 12) — Lets you make the Custom Object (with the stored data from the device) accessible from the Salesforce mobile app.
The Platform Event acts as an interface between the imp application and Salesforce. The Platform Event fields must have the names and types used in this example (see Step 6. If you change anything in the Platform Event definition, you will need to update the imp application’s agent source code. The name of the Platform Event is set in the agent code by the constant READING_EVENT_NAME.
All other entities listed above are fully independent of the imp application.
In this project, we explore a specific example, but this is just one scenario you can use. As you continue to explore using Electric Imp with Salesforce, you can try out different scenarios with new fields, rules, sets of entities, and more.
Step 4: Create A Salesforce Connected Application
Set Up A Salesforce Connected Application
This stage is used to authenticate the imp application in Salesforce:
- Launch your Developer Edition or Trailhead Playground org.
- Click the Setup icon in the top-right navigation menu and select Setup:

- Enter
App Managerin the Quick Find box and then select App Manager:
- Click New Connected App.
- In the New Connected App form, fill in:
- In the Basic Information section:
- Connect App Name:
Electric Imp SmartFridge - API Name: this will automatically become
Electric_Imp_SmartFridge. - Contact Email: enter your email address.
- Connect App Name:
- In the API (Enable OAuth Settings) section:
- Check Enable OAuth Settings.
- Callback URL: enter the agent URL (copy it from impCentral; see Step 3).
- Under Selected OAuth Scopes:
- Select Access and manage your data (api).
- Click Add:

- Click Save.
- Click Continue.
- You will be redirected to your Connected App’s page.
- Make a note of your Consumer Key (you will need to enter it into your agent code).
- Click Click to reveal next to the Consumer Secret field.
- Make a note of your Consumer Secret (you will need to enter it into your agent code):

- Do not close the Salesforce page.
- In the Basic Information section:
Add API Keys To Your Agent Code
- Return to impCentral.
- Find the SALESFORCE CONSTANTS section at the end of the agent code, and enter the Consumer Key and Consumer Secret from the step above as the values of the CONSUMER_KEY and CONSUMER_SECRET constants, respectively:

- Again, do not close impCentral.
Step 5: Create A Custom Object In Salesforce
Build A Custom Object
The Custom Object will be used to store the data received from the device.
- Return to the Salesforce page.
- Click the Setup icon in the top-right navigation menu and select Setup:
- Click the Object Manager tab next to Home:

- Click the Create dropdown and then select Custom Object:

- In the New Custom Object form fill in:
- In the Custom Object Information section:
- Label:
SmartFridge - Plural Label:
SmartFridges - Object Name:
SmartFridge
- Label:
- In the Enter the Record Name Label and Format section:
- Record Name:
Reading Id(replace the defaultSmartFridge Name) - Data Type: Auto Number.
- Display Format: R-{0000}.
- Starting Number:
1: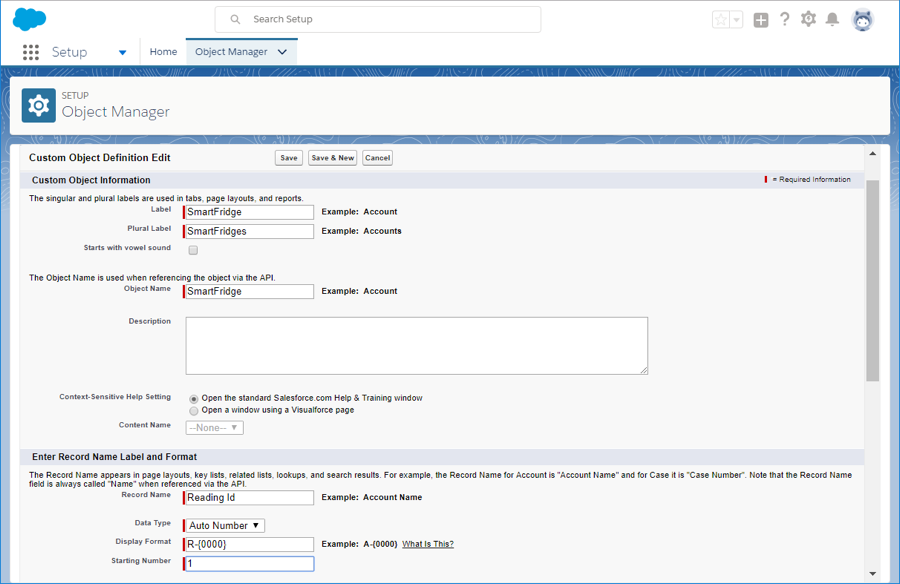
- Record Name:
- Click Save.
- In the Custom Object Information section:
- On the SmartFridge Custom Object page, make sure that the API Name is SmartFridge__c:

- Select the Fields & Relationships section from the left-hand navigation bar.
- Click New.
- Create a field for the temperature.
- In the Step 1. Choose the field type section:
- Data Type: Number.
- Click Next.
- In the Step 2. Enter the field details section:
- Field Label:
temperature - Length:
4 - Decimal Places:
2 - Field Name:
temperature: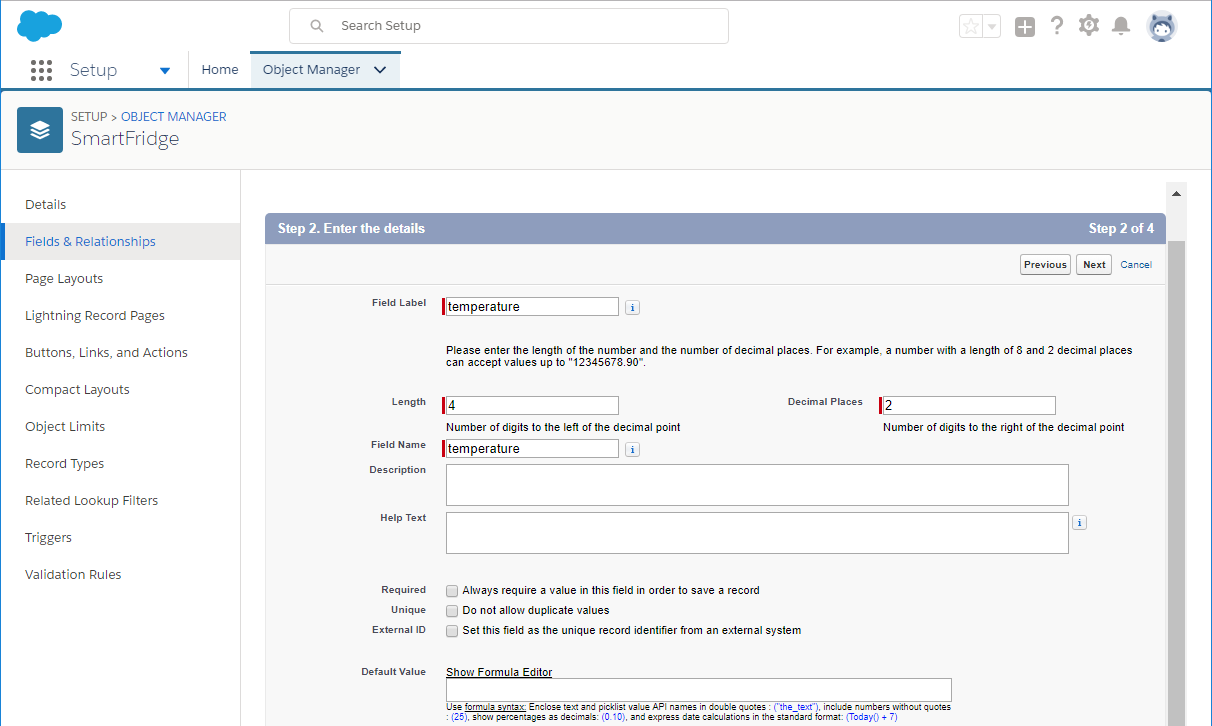
- Field Label:
- Click Next, Next, and then Save & New.
- In the Step 1. Choose the field type section:
- Create a field for the humidity.
- In the Step 1. Choose the field type section:
- Data Type: Number.
- Click Next.
- In the Step 2. Enter the details section:
- Field Label:
humidity - Length:
4 - Decimal Places:
2 - Field Name:
humidity
- Field Label:
- Click Next, Next, and then Save & New.
- In the Step 1. Choose the field type section:
- Create a field for the door status.
- In the Step 1. Choose the field type section:
- Data Type: Picklist.
- Click Next.
- In the Step 2. Enter the details section:
- Field Label:
door - Values: Select Enter values, with each value separated by a new line.
- Enter
OpenandClosedon separate lines. - Field Name:
door: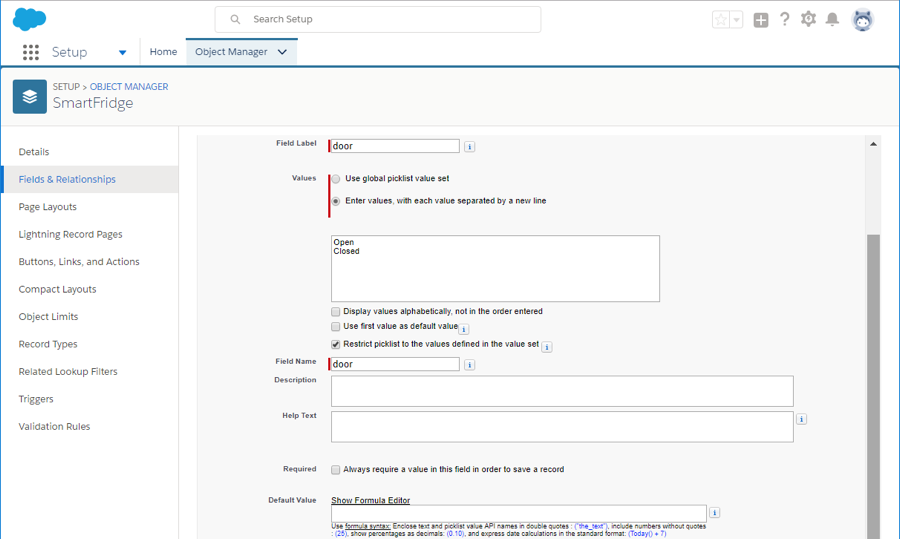
- Field Label:
- Click Next, Next, and then Save & New.
- In the Step 1. Choose the field type section:
- Create a field for the timestamp.
- In the Step 1. Choose the field type section:
- Data Type: Date/Time.
- Click Next.
- In the Step 2. Enter the details section.
- Field Label:
ts - Field Name:
ts
- Field Label:
- Click Next, Next, and then Save & New.
- In the Step 1. Choose the field type section:
- Create a field for the device’s ID.
- In the Step 1. Choose the field type section:
- Data Type: Text.
- Click Next.
- In the Step 2. Enter the details section:
- Field Label:
deviceId - Length:
16 - Field Name:
deviceId - Check Always require a value in this field in order to save a record.
- Check Set this field as the unique record identifier from an external system:

- Field Label:
- Click Next, Next, and then Save.
- In the Step 1. Choose the field type section:
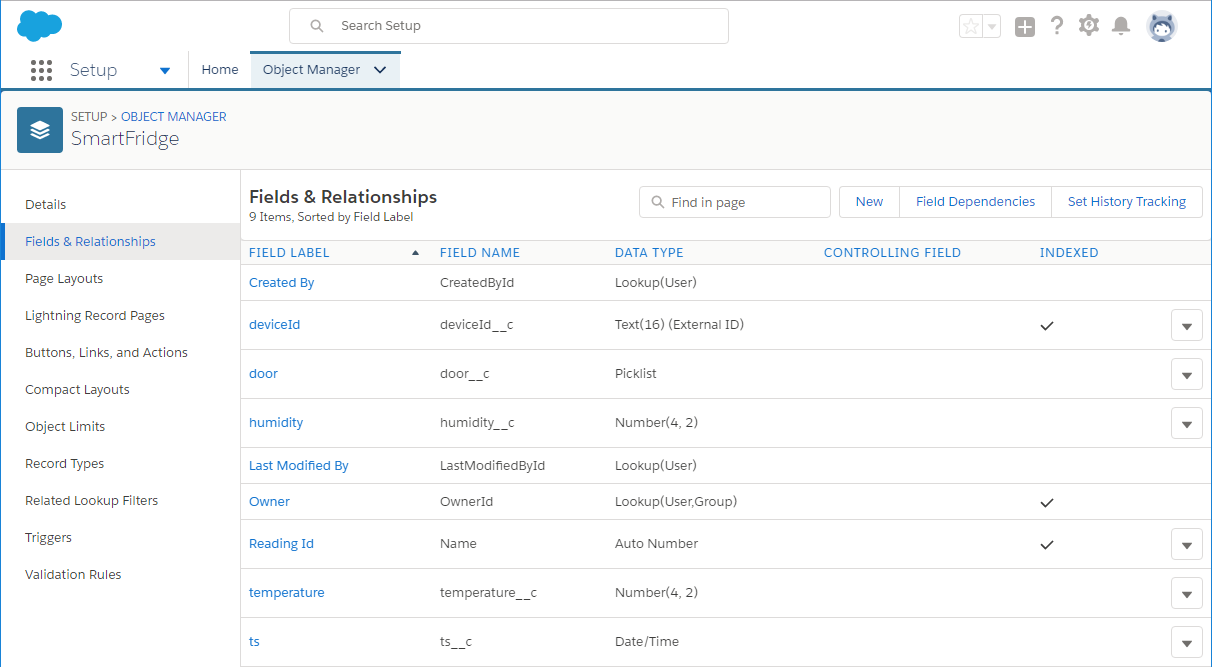
- Make sure that SmartFridge Fields & Relationships page looks like this:
Step 6: Create Platform Events In Salesforce
Set Up Platform Events In Salesforce
Platform Events transfer the data from the device to Salesforce. A Platform Event Trigger inserts the received data into the Custom Object we just defined.
The Platform Event fields must have the names and types mentioned here. If you change anything in the Platform Event definition, you will need to update the imp application’s agent code. The name of the Platform Event is entered into the agent code as a constant, READING_EVENT_NAME.
- On the Salesforce page, click the Setup icon in the top-right navigation menu and select Setup:
- Enter
Platform Eventsinto the Quick Find box and then select Platform Events:
- Click New Platform Event.
- In the New Platform Event form, fill in:
- Field Label:
Smart Fridge Reading - Plural Label:
Smart Fridge Readings - Object Name:
Smart_Fridge_Reading:
- Click Save.
- Field Label:
- You will be redirected to the Smart Fridge Reading Platform Event page. Now you need to create Platform Event fields that correspond to your fridge readings. In the Custom Fields & Relationships section, click New to create a field for the temperature:

- Data Type: Number.
- Click Next.
- Field Label:
temperature - Length:
4 - Decimal Places:
2 - Field Name:
temperature - Click Save.
- In the Custom Fields & Relationships section, click New to create a field for the humidity:
- Data Type: Number
- Click Next.
- Field Label:
humidity - Length:
4 - Decimal Places:
2 - Field Name:
humidity - Click Save.
- In the Custom Fields & Relationships section, click New to create a field for the door status:
- Data Type: Text.
- Click Next.
- Field Label:
door - Length:
10 - Field Name:
door - Click Save.
- In the Custom Fields & Relationships section, click New to create a field for the timestamp:
- Data Type: Date/Time.
- Click Next.
- Field Label:
ts - Field Name:
ts - Click Save.
- In the Custom Fields & Relationships section, click New to create a field for the device’s ID:
- Data Type: Text.
- Click Next.
- Field Label:
deviceId - Length:
16 - Field Name:
deviceId - Check Always require a value in this field in order to save a record.
- Click Save.
- Make sure that the Smart Fridge Reading API Name is Smart_Fridge_Reading__e and that Custom Fields & Relationships looks like this:

- Scroll down to the Triggers section, and click New:

- Enter the following code:
trigger SmartFridgeReadingReceived on Smart_Fridge_Reading__e (after insert) { List<SmartFridge__c> records = new List<SmartFridge__c>(); for (Smart_Fridge_Reading__e event : Trigger.New) { SmartFridge__c record = new SmartFridge__c(); record.deviceId__c = event.deviceId__c; record.temperature__c = event.temperature__c; record.humidity__c = event.humidity__c; record.door__c = event.door__c; record.ts__c = event.ts__c; records.add(record); } insert records; } - Click Save.
Note Typically, you would use an Orchestration to update the SmartFridge records, but since we are not implementing any logic or decision-making for this step, we use the Apex Trigger as an alternative to Orchestration. This approach may help you with any troubleshooting.
Add Salesforce ID Data To Your Agent Code
- Return to impCentral.
- Find the SALESFORCE CONSTANTS section at the end of the agent code and make sure your READING_EVENT_NAME constant value is Smart_Fridge_Reading__e (ie. the same as Smart Fridge Reading API Name value of the Platform Event you just created):
- Again, do not close impCentral.
Step 7: Create A Context In Salesforce
Set Up A Context In Salesforce
A context allows Salesforce IoT to match streaming event data with contextual data that you already store in Salesforce. Records between Platform Events and Salesforce Objects are matched via a key field, which you define when setting up the context, and is required for building an Orchestration. This combination allows you to set up rules in your Orchestration that can trigger relevant actions for your business.
- On the Salesforce page, click the Setup icon in the top-right navigation menu and select Setup:
- Enter
Salesforce IoTinto the Quick Find box, select Get Started and then Enable Salesforce IoT in the bottom right of the panel: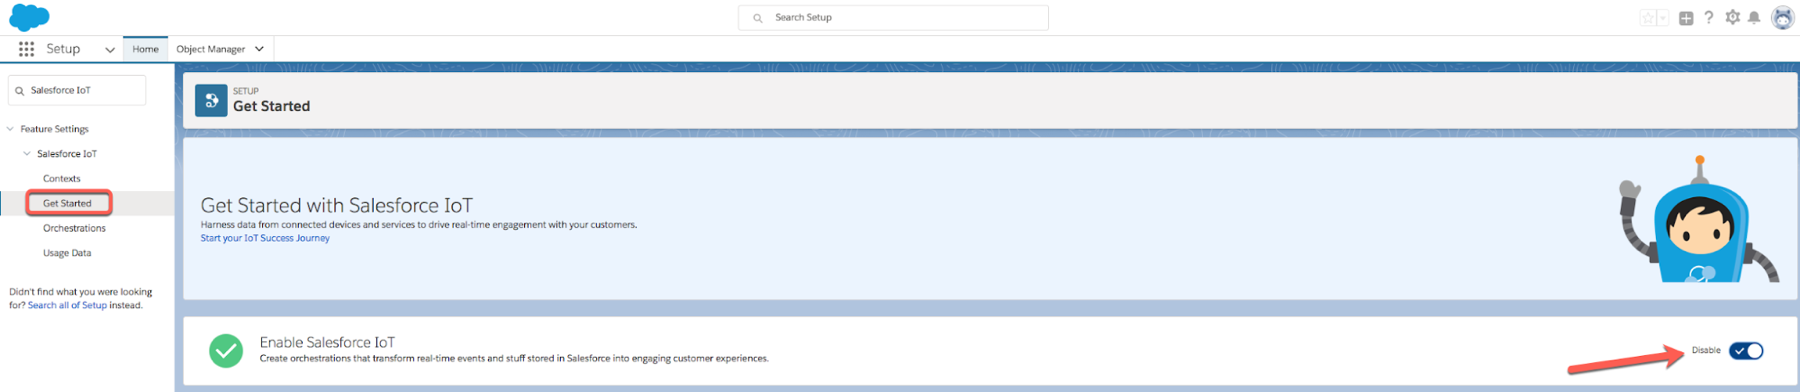
- Enter
Contextsinto the Quick Find box and then select Contexts:
- Click New Context.
- Click Get Started.
- For Salesforce Object, select Case.
- Click Next.
- For Platform Event, select Smart Fridge Reading.
- Click Next.
- In the Context Detail form, fill in:
- Name:
Smart Fridge Context - API Name:
Smart_Fridge_Context
- Name:
- Click Finish.
- Click Activate, select the checkbox in the popup and then click Activate.
- You will be redirected to the Smart Fridge Context page.
Step 8: Create A Custom Case Field In Salesforce
Customize The Case Object
This example uses customized Cases which are standard Case objects with an additional field for device ID.
- On the Salesforce page, click the Setup icon in the top-right navigation menu and select Setup:
- Click the Object Manager tab next to Home:
- Click Case.
- Select the Fields & Relationships section and click New:
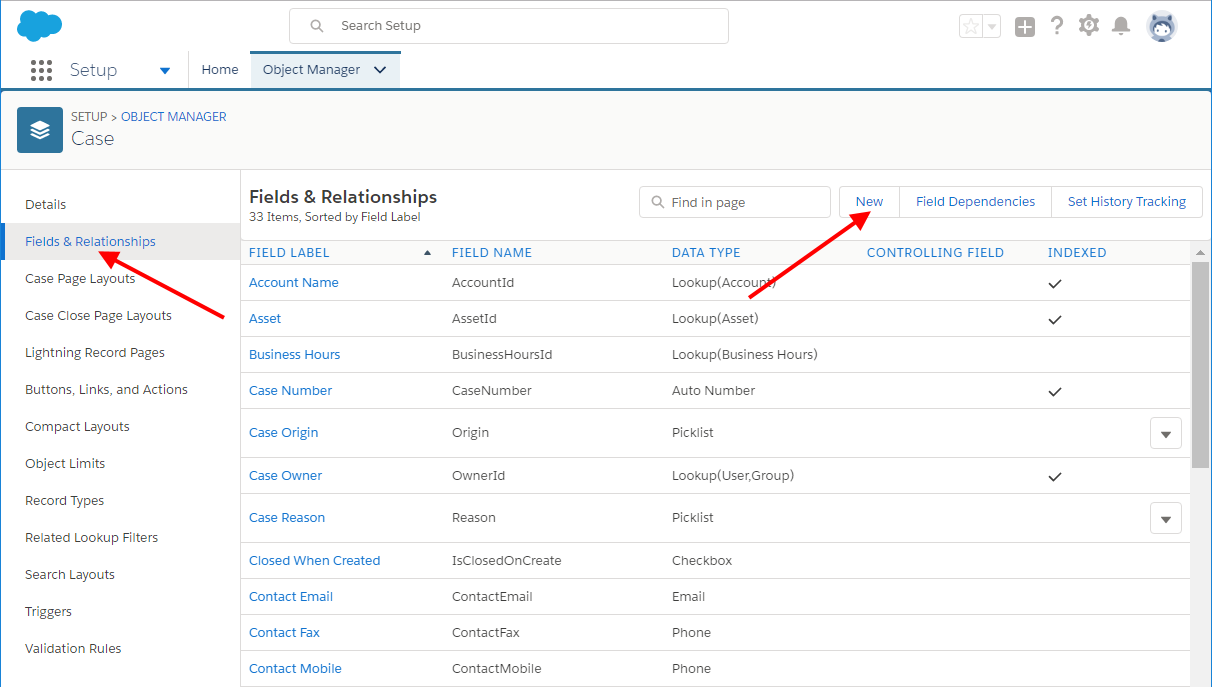
- In the New Custom Field form:
- In the Step 1. Choose the field type section:
- Data Type: Text.
- Click Next.
- In the Step 2. Enter the details section:
- Field Label:
deviceId - Length:
16 - Field Name:
deviceId - Check Set this field as the unique record identifier from an external system:
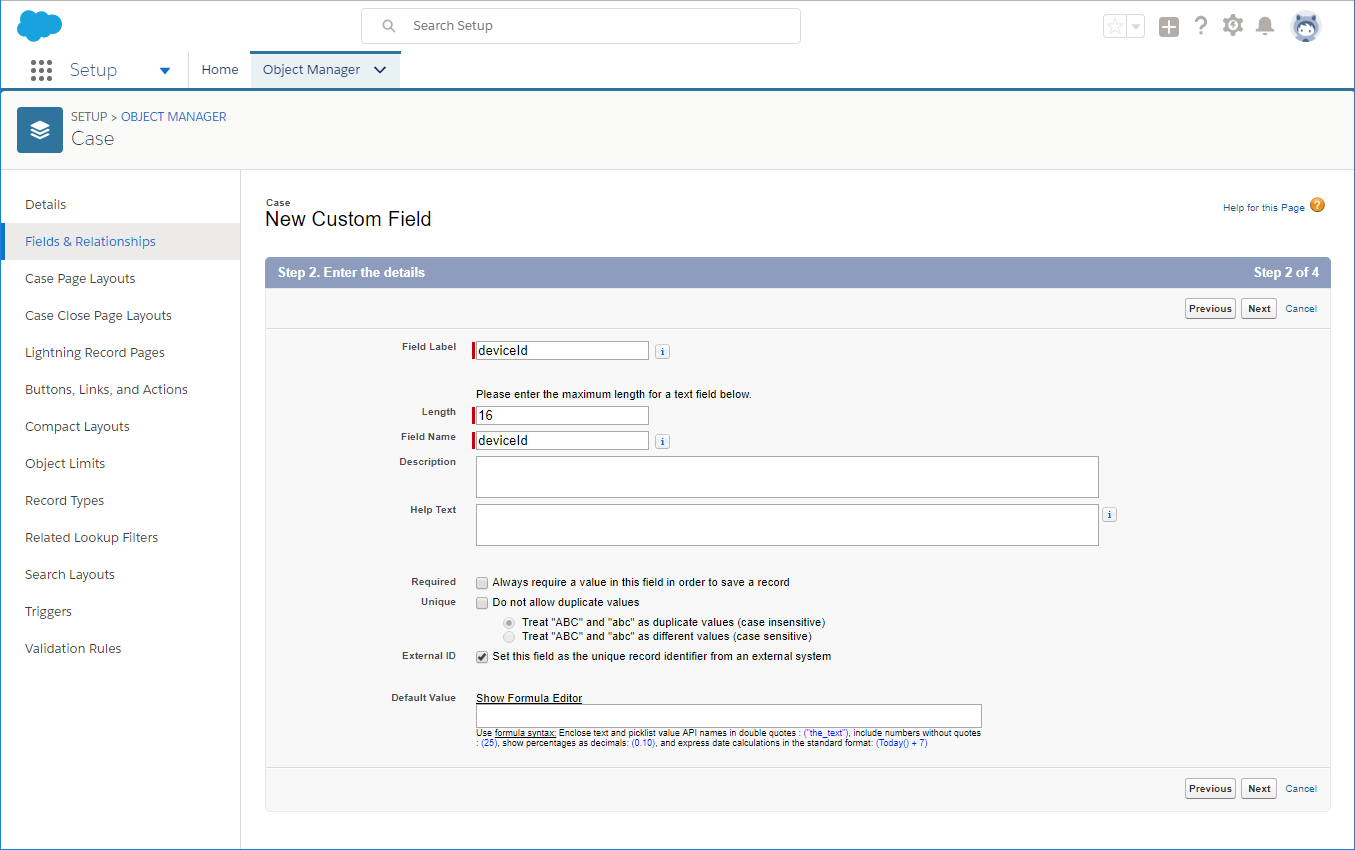
- Field Label:
- Click Next, Next and then Save.
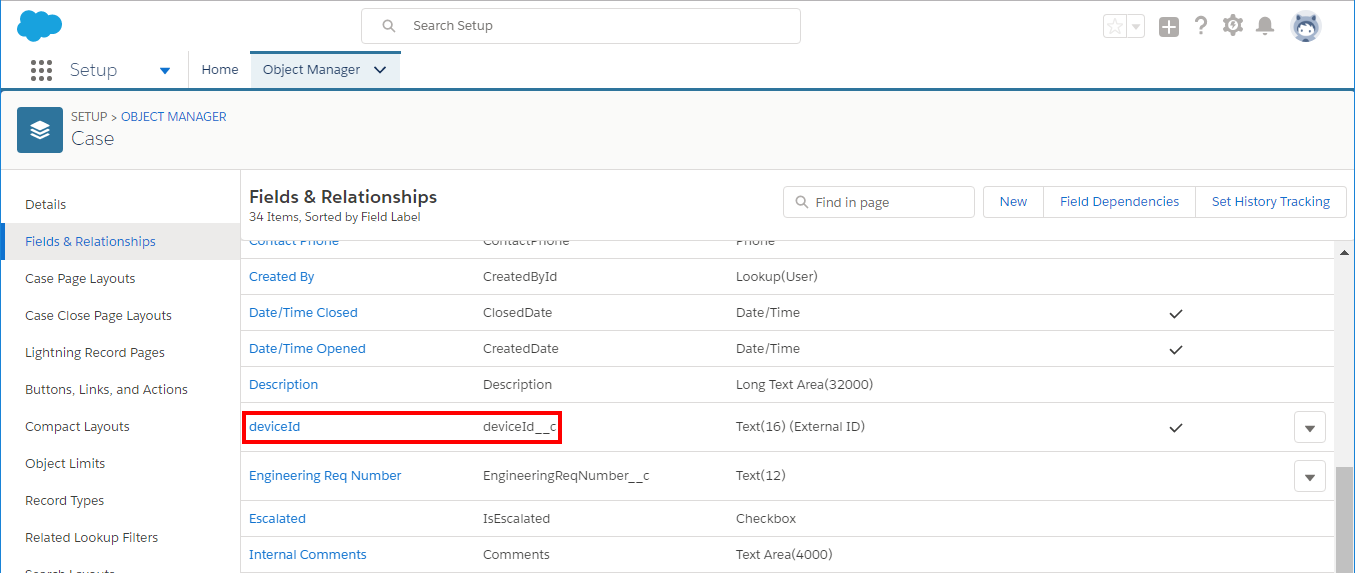
- In the Step 1. Choose the field type section:
- Select the Fields & Relationships section and find your newly created deviceId custom field. Make sure the Field Name is set to deviceId__c:
Step 9: Create An Orchestration In Salesforce
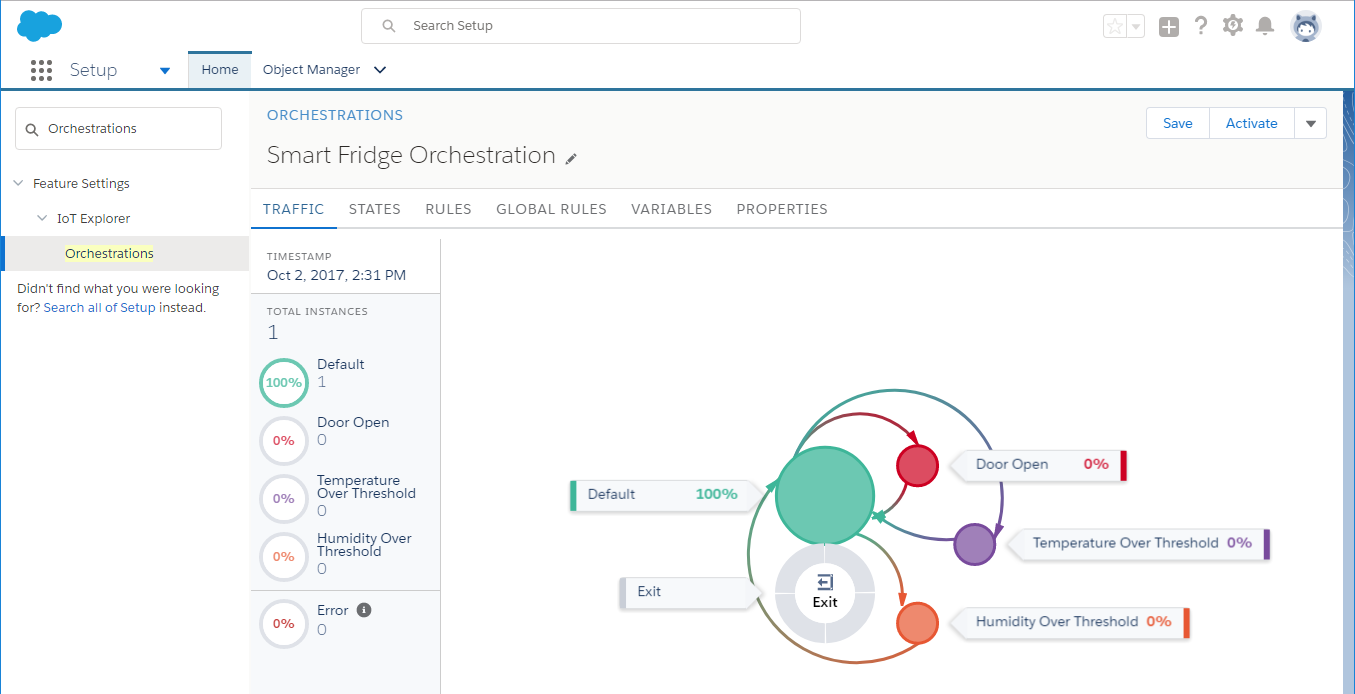
A Salesforce Orchestration defines a state machine, with devices moving to between different states depending on real-time event data and historical customer and contextual data. Actions and outputs are defined by customizable rules for each State, and let you define tailored experiences for each device. You can see in the following diagram how a fridge is normally in the Default state but will move to one of the other states as it reacts to Platform Events.
In this example, as the device moves into these other states, the Orchestration opens Cases based on the following specific rules, which are set up as part of the Orchestration:
- The refrigerator door is opened during three consecutive data readings (the exact threshold is between 30 and 45 seconds).
- The temperature rises above 11°C.
- The relative humidity rises above 70%.

If you are wondering why there are no transitions between Open, Temperature Over Threshold, and Humidity Over Threshold, it is because such transitions would result in multiple cases being opened simultaneously. This should be avoided, so the state machine is set up to ensure that further cases won’t be created until a given issue is resolved and the impExplorer returned to the Default state.
Create The Orchestration
- On the Salesforce page, click the Setup icon in the top-right navigation menu and select Setup:
- Enter
Orchestrationsinto the Quick Find box and select Orchestrations:
- Click New Orchestration.
- In the New Orchestration popup, fill in:
- Name:
Smart Fridge Orchestration - Context: choose the Smart Fridge Context you created earlier:
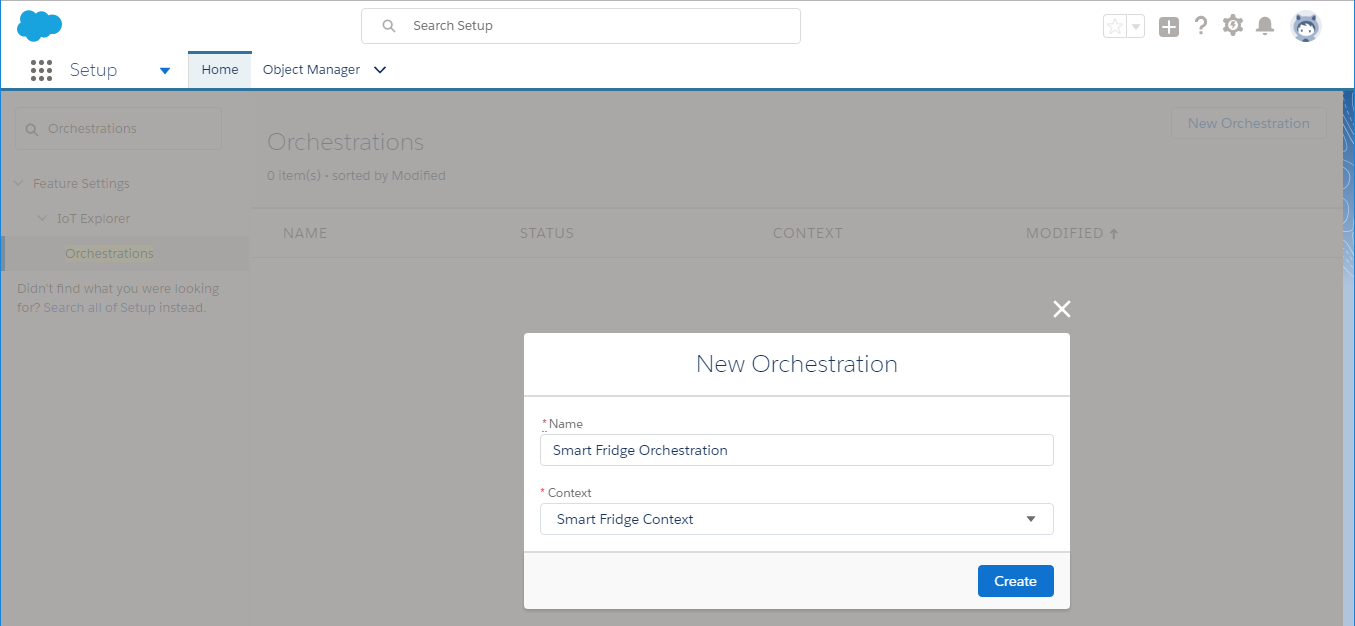
- Click Create.
- You will be redirected to the Smart Fridge Orchestration page.
- Name:
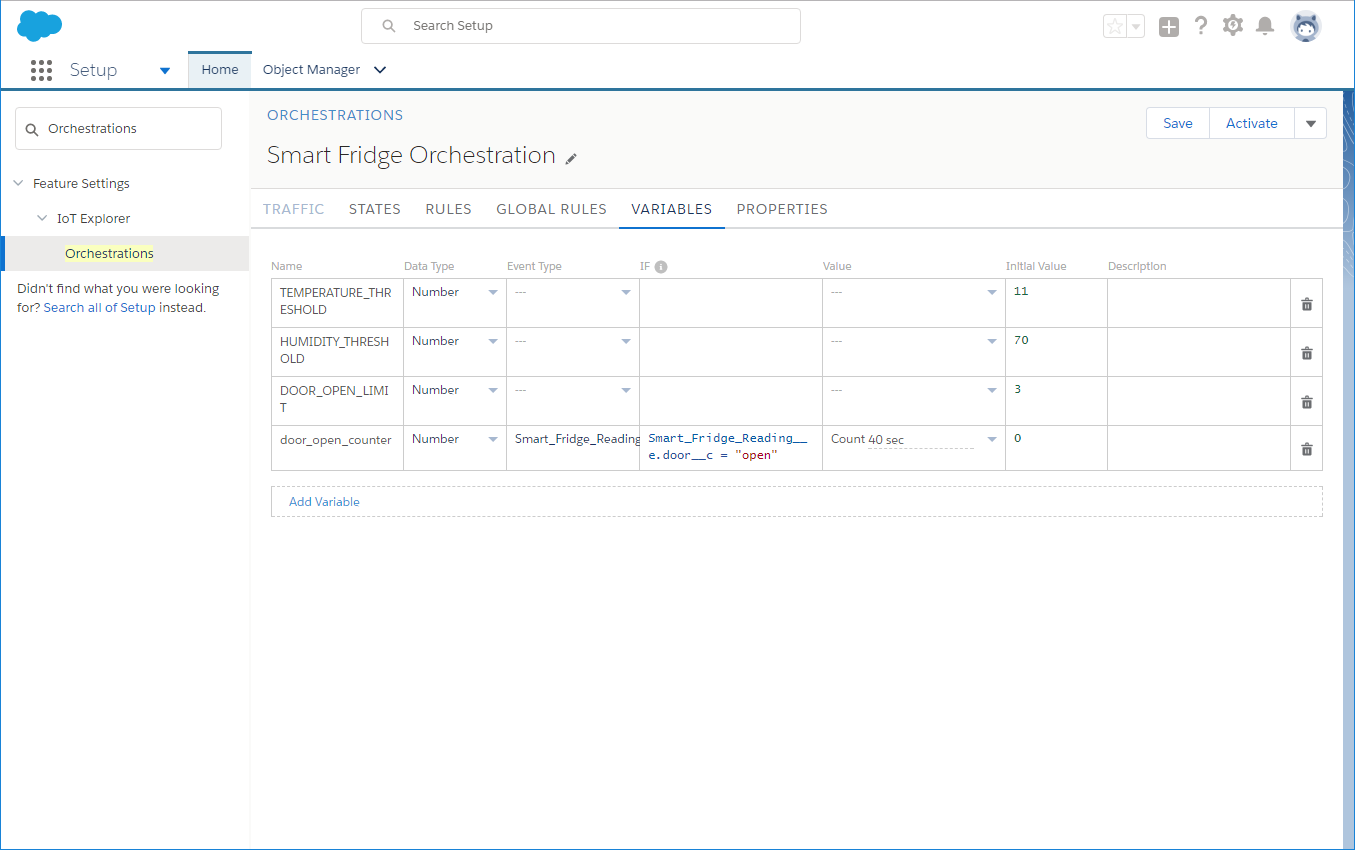
Set Up Orchestration Variables
- Click Variables. Now you can to set up temperature and humidity thresholds, and a door opening counter and limit.
- Click Add Variable:

- Create a variable for the temperature threshold.
- Name:
TEMPERATURE_THRESHOLD - Data Type: Number.
- Initial Value:
11(for 11°C). - Click Add Variable.
- Name:
- Create a variable for the humidity threshold.
- Name:
HUMIDITY_THRESHOLD - Data Type: Number.
- Initial Value:
70(for 70%). - Click Add Variable.
- Name:
- Create a variable for the door opening counter limit.
- Name:
DOOR_OPEN_LIMIT - Data Type: Number.
- Initial Value:
3(for three consecutive data readings with door status). - Click Add Variable.
- Name:
- Create a variable for the door open counter.
- Name:
door_open_counter - Data Type: Number.
- Event Type: Smart_Fridge_Reading__e (the Platform Event you created earlier in Step 6).
- IF:
Smart_Fridge_Reading__e.door__c = "open". - Value: Count 40 sec (for three consecutive data readings fit in 40 seconds).
- Initial Value:
0
- Name:
- Make sure your Orchestration variables look like this:
Establish Orchestration Global Rules
- Click Global Rules.
- In the When column, choose Smart_Fridge_Reading__e.
- In the IF column, enter:
Smart_Fridge_Reading__e.door__c = "closed" - In the Action column, choose Reset Variable and then choose door_open_counter.
- Make sure your Global Rules page looks like this:

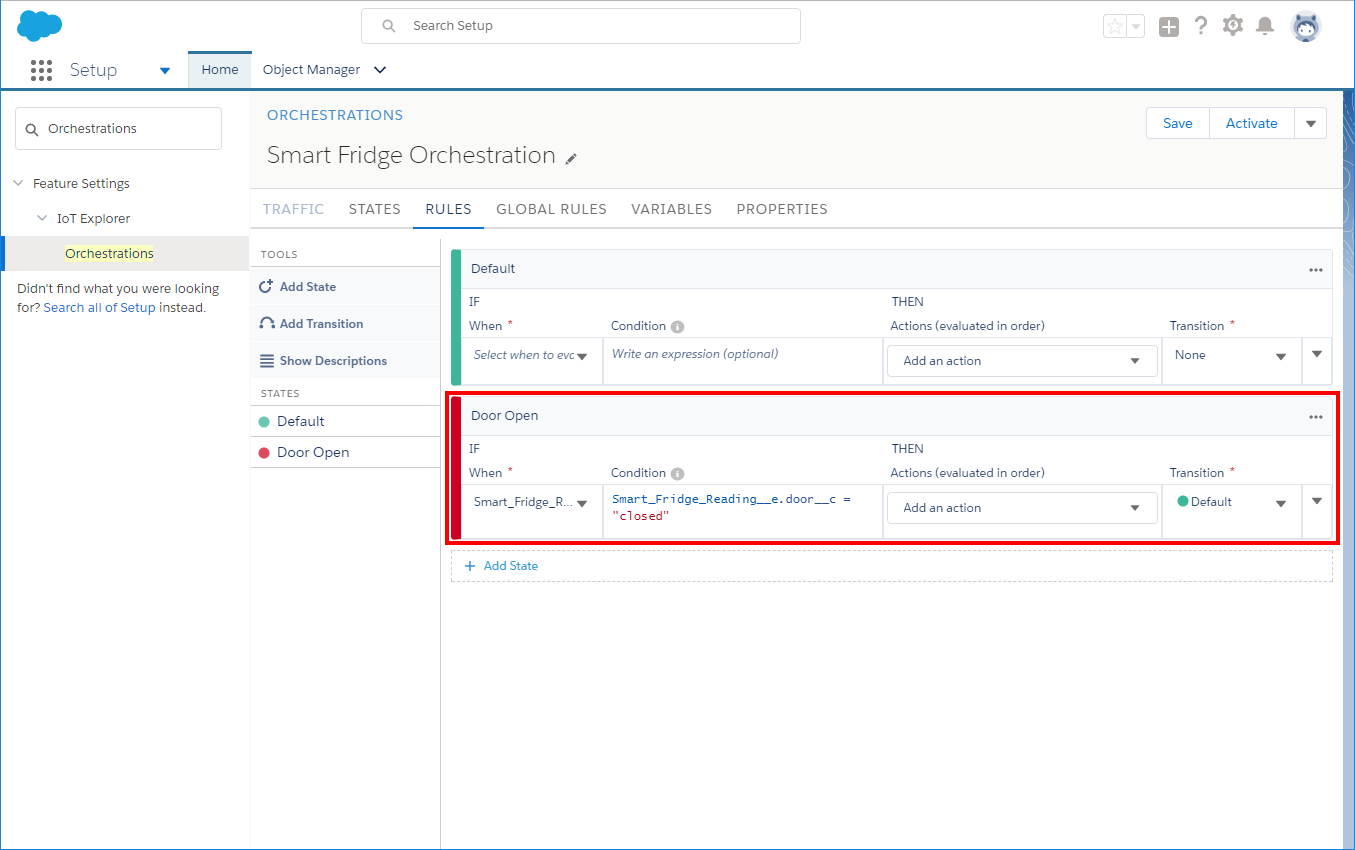
Create Orchestration Rules
Click Rules and create three orchestration rules:
Door Open Rule
- Click Add State:

- Enter
Door Openas the new state name. - In the When column of the Door Open state, click Select when to evaluate rule and choose Smart_Fridge_Reading__e.
- In the Condition column, enter:
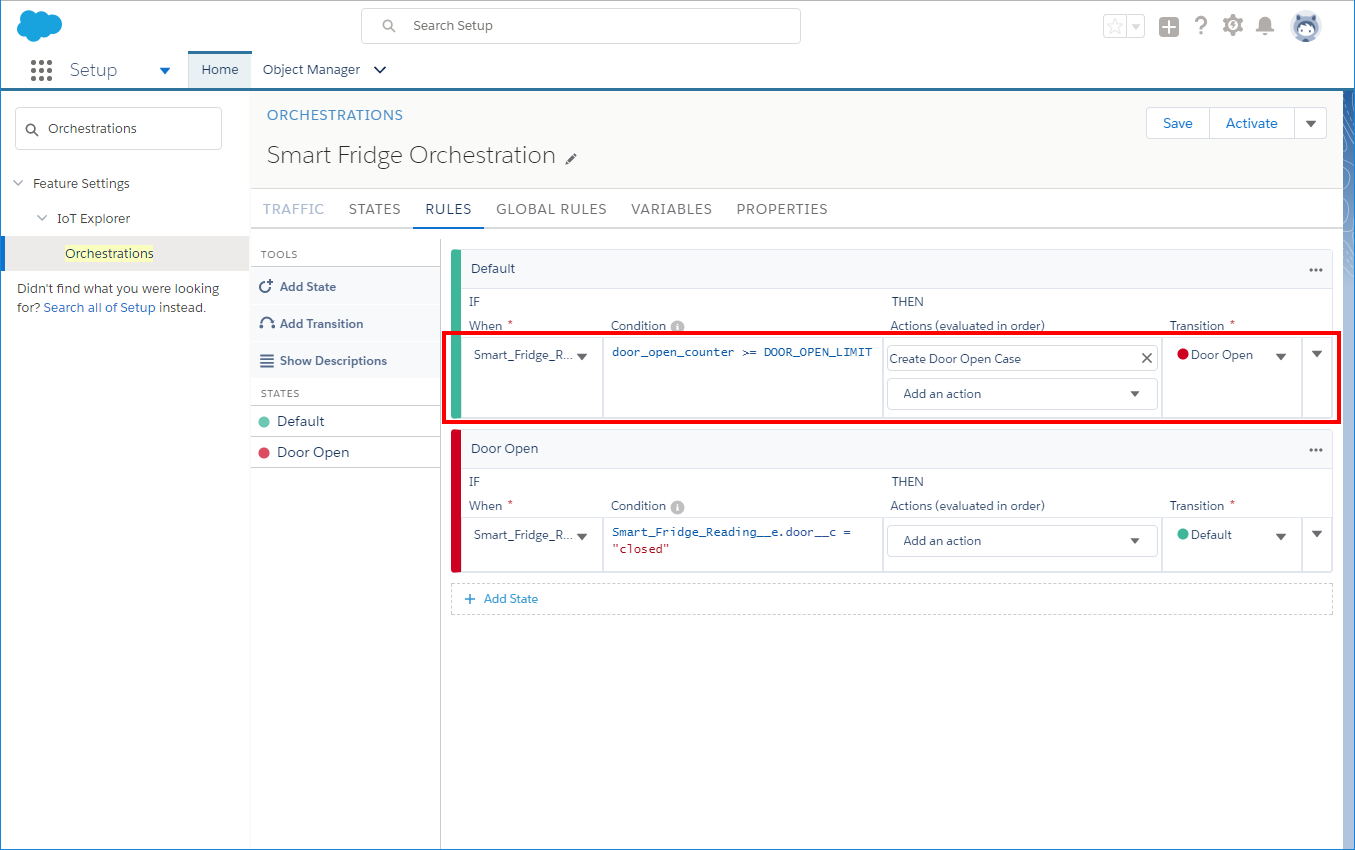
Smart_Fridge_Reading__e.door__c = "closed" - In the Transition column, choose Default:
- In the When column of the Default state, click Select when to evaluate rule and choose Smart_Fridge_Reading__e.
- In the Condition column, enter:
door_open_counter >= DOOR_OPEN_LIMIT - In the Actions column, click Add an action and choose OUTPUT ACTIONS > Salesforce Record.
- In the New Salesforce Output Action popup, choose:
- Object: Case.
- Action Type: Create:

- Click Next.
- In the Assign values to record fields table:
- Click Add Field.
- In the Select field, choose deviceId__c.
- Enter value:
Smart_Fridge_Reading__e.deviceId__c - Click Add Field.
- In the Select field, choose Subject.
- Enter value:
Refrigerator Door Open - Click Add Field.
- In the Select field, choose Description.
- Enter value:
door has been opened for too long
- In the Action Name field, enter:
Create Door Open Case - Make sure that the Assign values to record fields table looks like this:
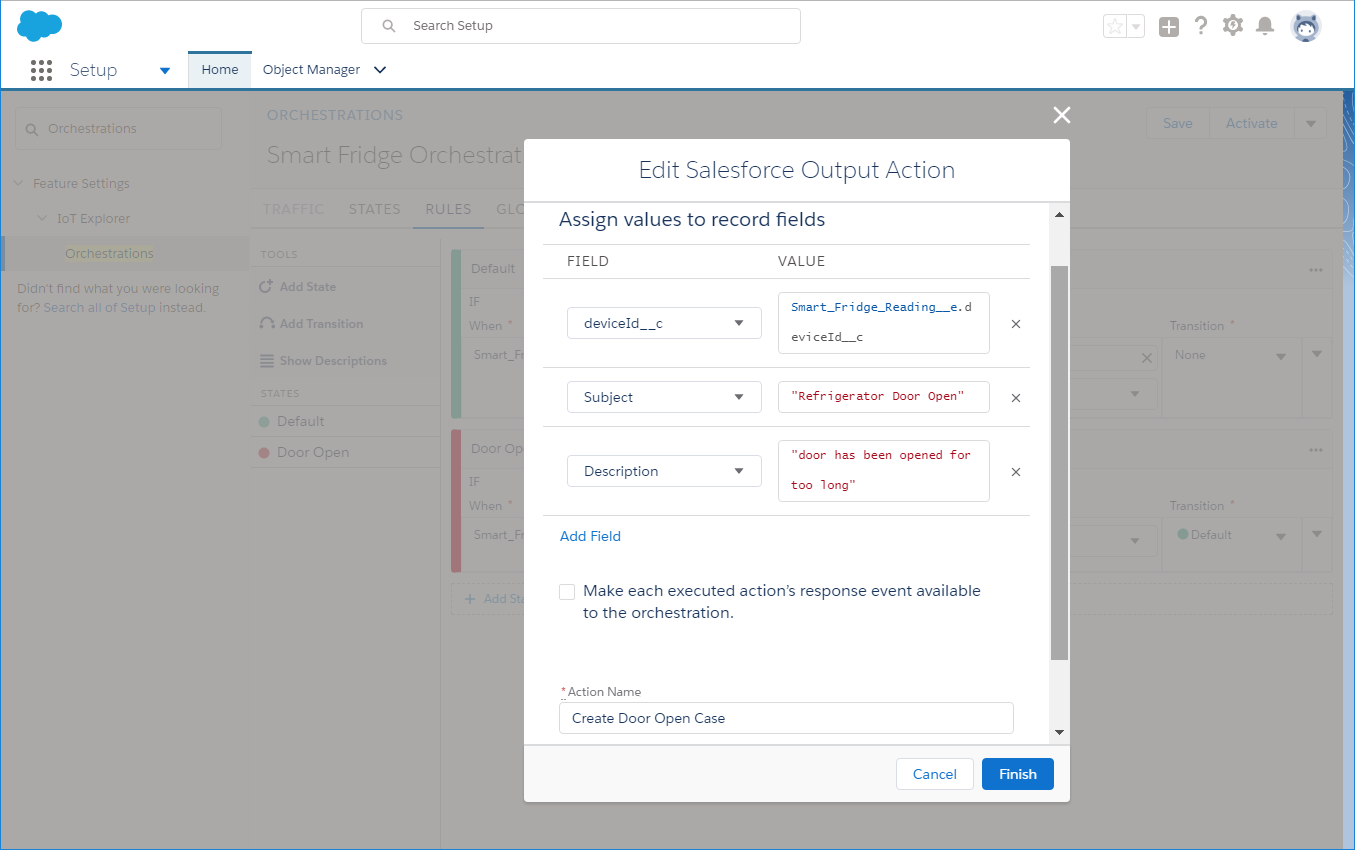
- Click Finish.
- In the Transition column, choose Door Open:
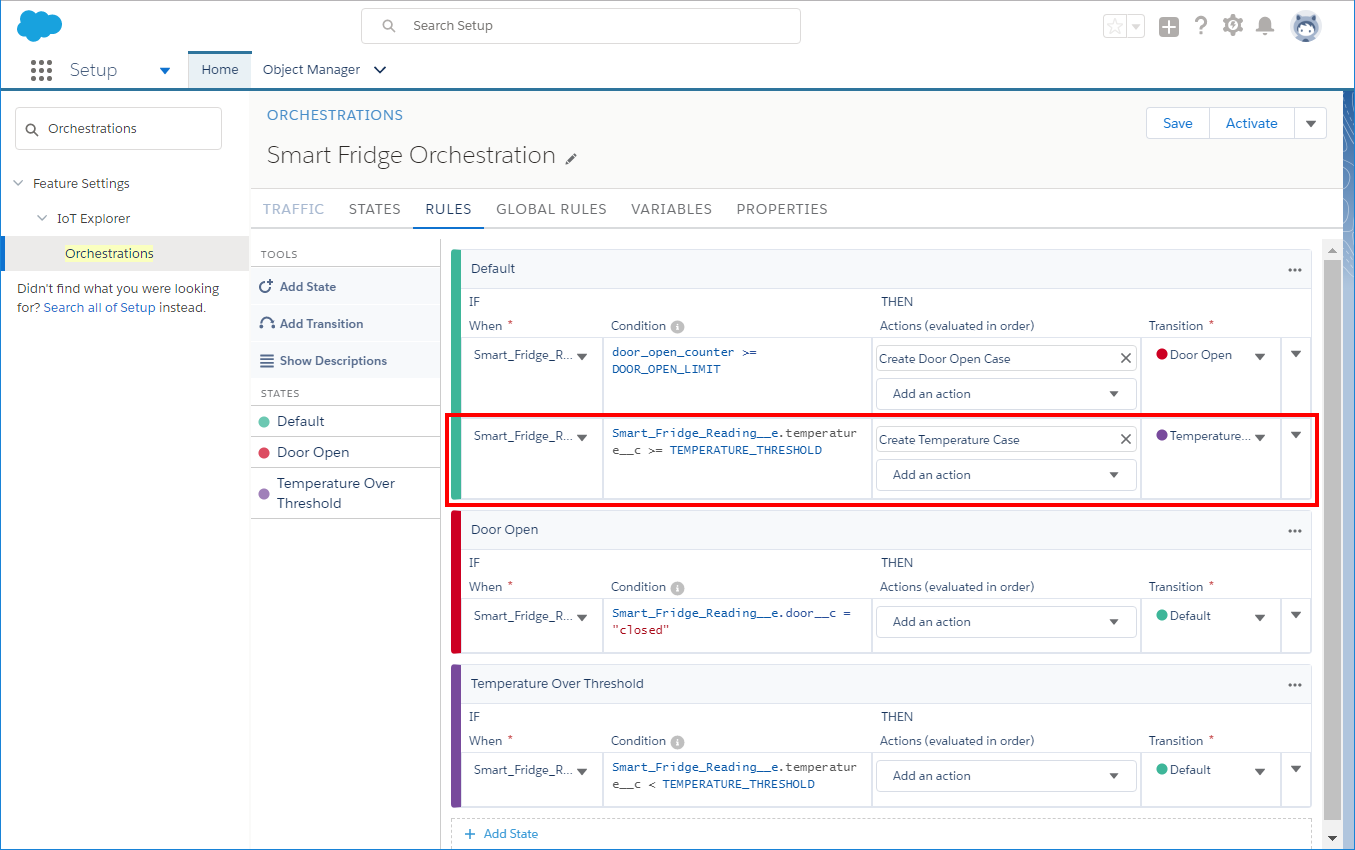
Temperature Threshold Rule
- Click Add State.
- Enter
Temperature Over Thresholdas the new state name. - In the When column of the Temperature Over Threshold state, click Select when to evaluate rule and choose Smart_Fridge_Reading__e.
- In the Condition column, enter:
Smart_Fridge_Reading__e.temperature__c < TEMPERATURE_THRESHOLD - In the Transition column, choose Default:

- Click Add rule in the Default state menu:
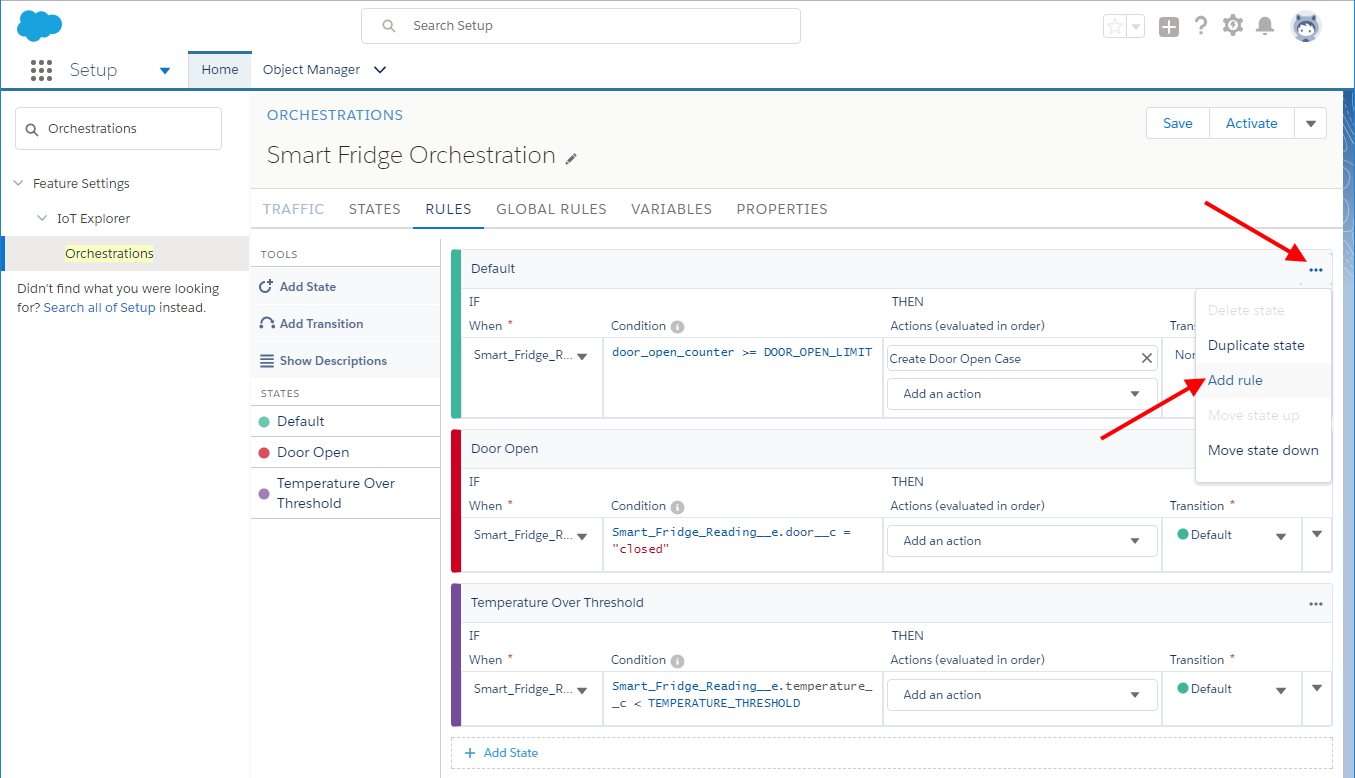
- In the When column, click Select when to evaluate rule and choose Smart_Fridge_Reading__e.
- In the Condition column, enter:
Smart_Fridge_Reading__e.temperature__c >= TEMPERATURE_THRESHOLD - In the Actions column, click Add an action and then choose OUTPUT ACTIONS > Salesforce Record.
- In the New Salesforce Output Action popup choose:
- Object: Case.
- Action Type: Create.
- Click Next.
- In the Assign values to record fields table:
- Click Add Field.
- In the Select field, choose deviceId__c.
- Enter value:
Smart_Fridge_Reading__e.deviceId__c - In the Select field, choose Subject.
- Enter value:
"Temperature Over Threshold" - Click Add Field.
- In the Select field, choose Description.
- Enter value:
"current temperature " + TEXT(Smart_Fridge_Reading__e.temperature__c) + " is over threshold".
- In the Action Name field, enter:
Create Temperature Case - Make sure that the Assign values to record fields table looks like this:
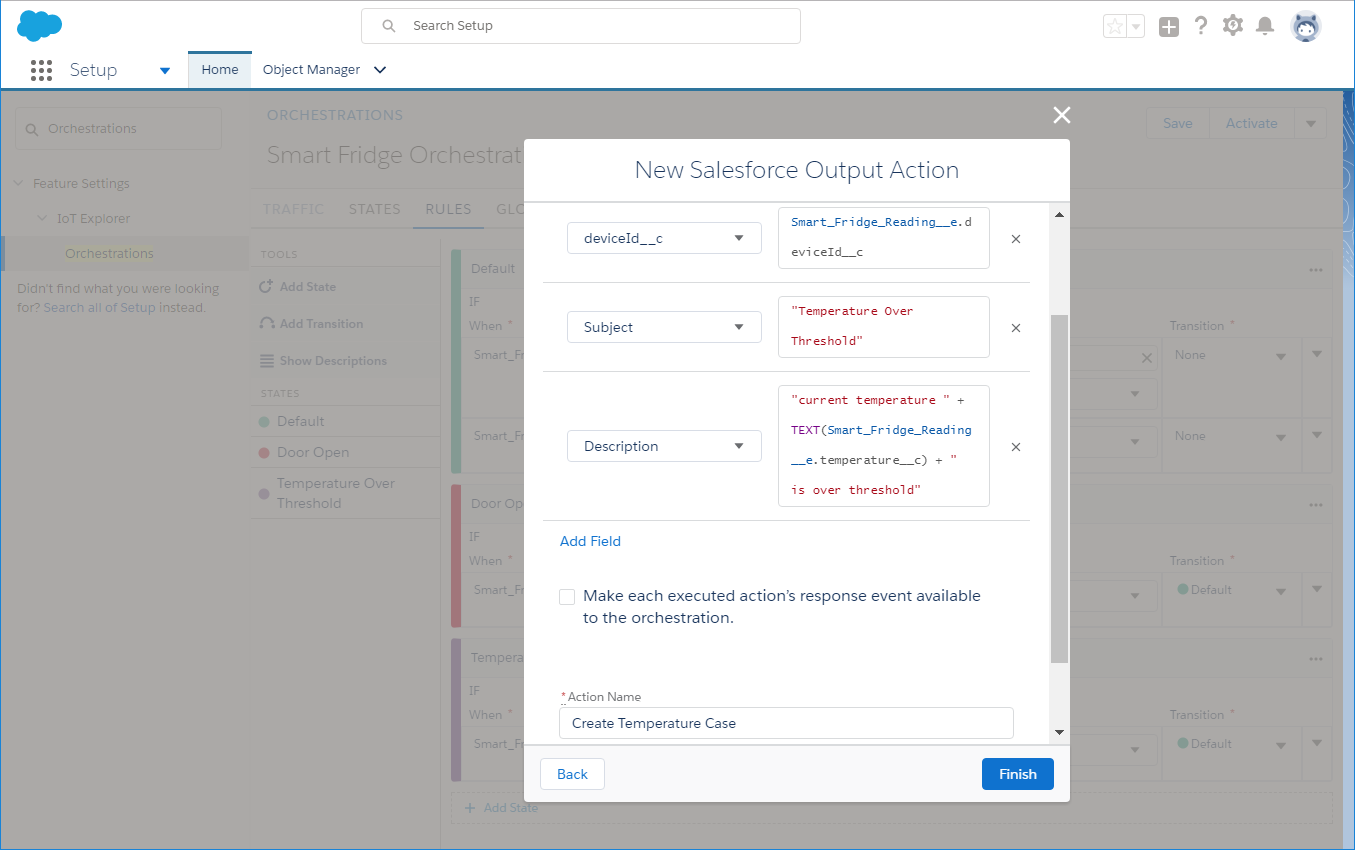
- Click Finish.
- In the Transition column, choose Temperature Over Threshold:
Humidity Threshold Rule
- Click Add State.
- Enter
Humidity Over Thresholdas the new state name. - In the When column of the Humidity Over Threshold state, click Select when to evaluate rule and choose Smart_Fridge_Reading__e.
- In the Condition column, enter:
Smart_Fridge_Reading__e.humidity__c < HUMIDITY_THRESHOLD - In the Transition column, choose Default:

- Click Add rule in the Default state menu.
- In the When column, click Select when to evaluate rule and then choose Smart_Fridge_Reading__e.
- In the Condition column, enter:
Smart_Fridge_Reading__e.humidity__c >= HUMIDITY_THRESHOLD - In the Actions column, click Add an action and choose OUTPUT ACTIONS > Salesforce Record.
- In the New Salesforce Output Action popup choose:
- Object: Case.
- Action Type: Create.
- Click Next.
- In the Assign values to record fields table:
- Click Add Field.
- In the Select field, choose deviceId__c.
- Enter value:
Smart_Fridge_Reading__e.deviceId__c - In the Select field, choose Subject.
- Enter value:
"Humidity Over Threshold" - Click Add Field.
- In the Select field, choose Description.
- Enter value:
"current humidity " + TEXT(Smart_Fridge_Reading__e.humidity__c) + " is over threshold"
- In the Action Name field enter:
Create Humidity Case - Make sure that the Assign values to record fields table looks like this:

- Click Finish.
- In the Transition column, choose Humidity Over Threshold:

Orchestatration Activation
- Click States. Make sure that your states diagram looks like this:

- Click Activate.
- In the Activating Orchestration popup, click Activate:
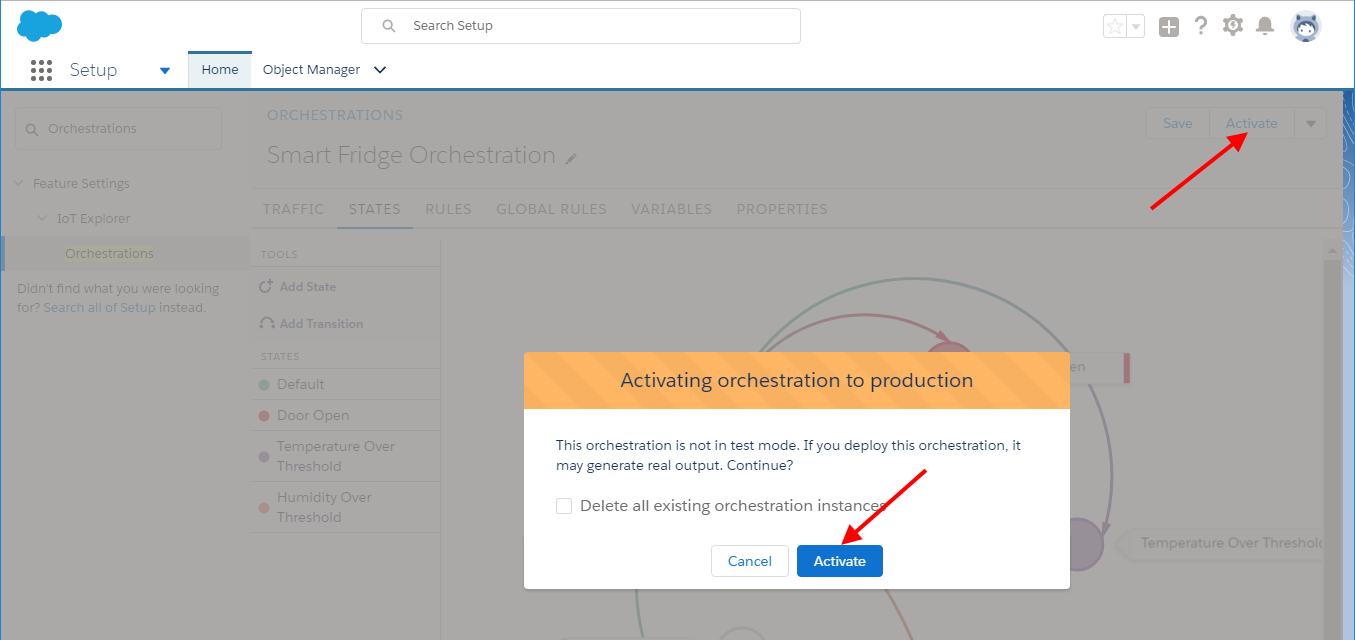
- Do not close the Salesforce page.
Step 10: Build and Run the Electric Imp Application
Get Your Application Up and Running
- Return to impCentral.
- Make sure your device is powered on and connected to WiFi; impCentral should show the device is online.
- Click the dropdown arrow and select Build and Force Restart to syntax-check, compile and deploy the code:
- Look at the log pane to see messages from your running application. If you see
[Agent] ERROR: Not logged into Salesforce, it means your application is not authorized to connect to Salesforce. This example uses OAuth 2.0 for authentication, and the agent has been set up as a web server to handle the authentication procedure.- Click the agent URL in impCentral.
- You will be redirected to the login page.
- Log into Salesforce on that page.
- If login is successful, the page should display
"Authentication complete - you may now close this window. - Close that page and return to impCentral.
- Make sure there are no further errors in the logs.
- Make sure there are periodic logs like this:
[Agent] Readings sent successfully. - Your application is now up and running.
Step 11: Place Your impExplorer Kit in a Refrigerator
Test Your impExplorer Kit
Open your refrigerator and place the impExplorer Kit on a shelf in your refrigerator door.
If you don’t have a fridge handy for this scenario, you can test the example by emulating different conditions. For example, you can emulate a fridge door being open or closed by placing the impExplorer under a light or into a really dark place. Emulate the high-temperature case by moving the device from a cold place to a much warmer one.
Step 12: Monitor The Transmitted Data
You can use the Salesforce mobile app to see the data that your device sends. To do this, perform the following tasks.
Create A Custom Object Tab
This is needed to make the Custom Object with the stored data from the device accessible by the Salesforce mobile app.
- Return to Salesforce.
- Click the Setup icon in the top-right navigation menu and select Setup:
- Enter
Tabsinto the Quick Find box and select Tabs. - Under Custom Object Tabs, click New.
- Choose SmartFridge from the Object dropdown.
- Choose Thermometer as the Tab Style.
- Click Next, Next, and then Save.
- From the App Launcher, enter
SmartFridgein the Find an app or item box, then click SmartFridge. From the List View dropdown menu, click All SmartFridges. You should see readings sent from your impDevice (you may need to refresh your browser to get the latest reading).
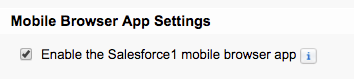
Check That the Salesforce Mobile App Is Enabled
- Click the Setup icon in the top-right navigation menu and select Setup:
- Enter
Salesforceinto the Quick Find box and select Salesforce. - Check Enable the Salesforce1 mobile browser app:
- Enter
Usersin the Quick Find box and select Users. - Click Edit next to your username.
- Make sure that MobileUser is checked. If not, check it and click Save:

Run the Salesforce Mobile App
You can access and run the Salesforce mobile app in three ways:
- As a mobile app that you download from the Apple iTunes Store or Google Play, and install and run on your phone. This is the recommended approach.
- By opening the login.salesforce.com page in a browser on your phone.
- By using the Chrome Developer Tools (described below).
Using the Chrome Developer Tools
Use this approach if you want or need to run the Salesforce mobile app on your PC, not on a mobile phone. It is possible to emulate the Salesforce mobile app in the Chrome web browser.
- On the Salesforce page, click the Setup icon in the top-right navigation menu and select Setup:
- Copy the current opened URL into clipboard.
- Open a new tab in your Chrome browser.
- Open the Chrome Developer Tools by clicking View > Developer > Developer Tools.
- Click Toggle Device Mode to simulate your browser as a mobile device:

- Paste the URL you copied before. Do not press Enter.
- Remove the part of the URL immediately after
lightning.force.com/lightning. For example:

- Press Enter. The Salesforce mobile app emulation will start up in Chrome. If the display is too small, change the size to 100%:

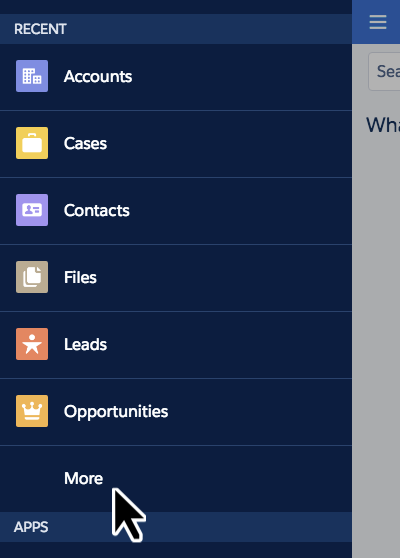
- Click the hamburger menu in the upper left to open the navigation panel.
- Under the Recent section, scroll down and click More:
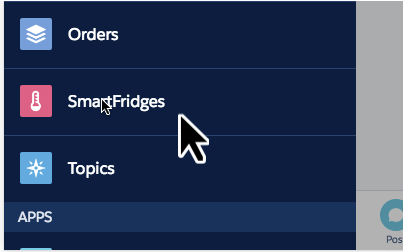
- Find SmartFridges on the list and then click it:
- Select a record to view the details of the reading:

Step 13: Monitor Orchestration State Transitions And Cases
Test Orchestration State Transitions
You can now see transitions between the states that you defined in the IoT Explorer Orchestration section, as well as registered Cases.
- On the Salesforce page, click the Setup icon in the top-right navigation menu and select Setup:
- Enter
Orchestrationsinto the Quick Find box and select Orchestrations: - Click Smart Fridge Orchestration.
- Click Traffic.
- If your impExplorer is inside a fridge, you should see that your device is in the normal, Default state:
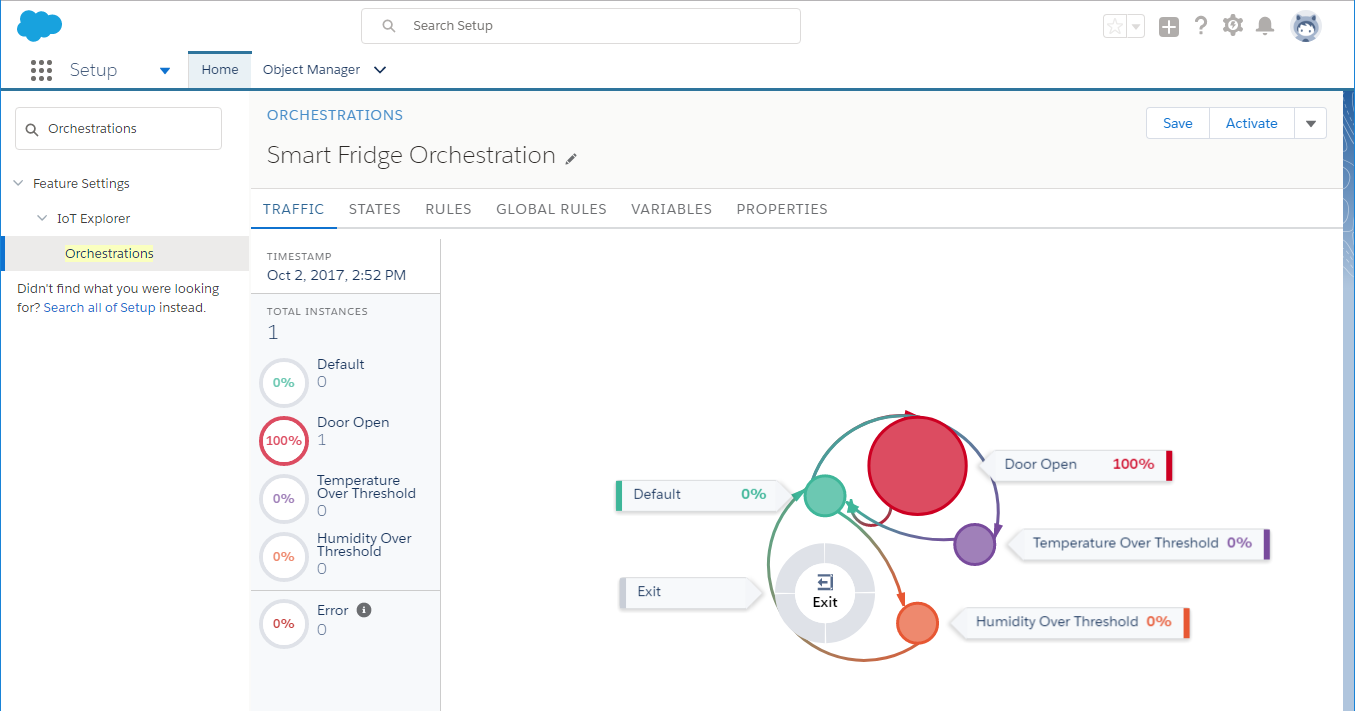
- Keep the fridge door open for over 45 seconds (or just place the impExplorer in a brightly lit room). On the Traffic tab, you should see that your device has now moved into the Door Open state:
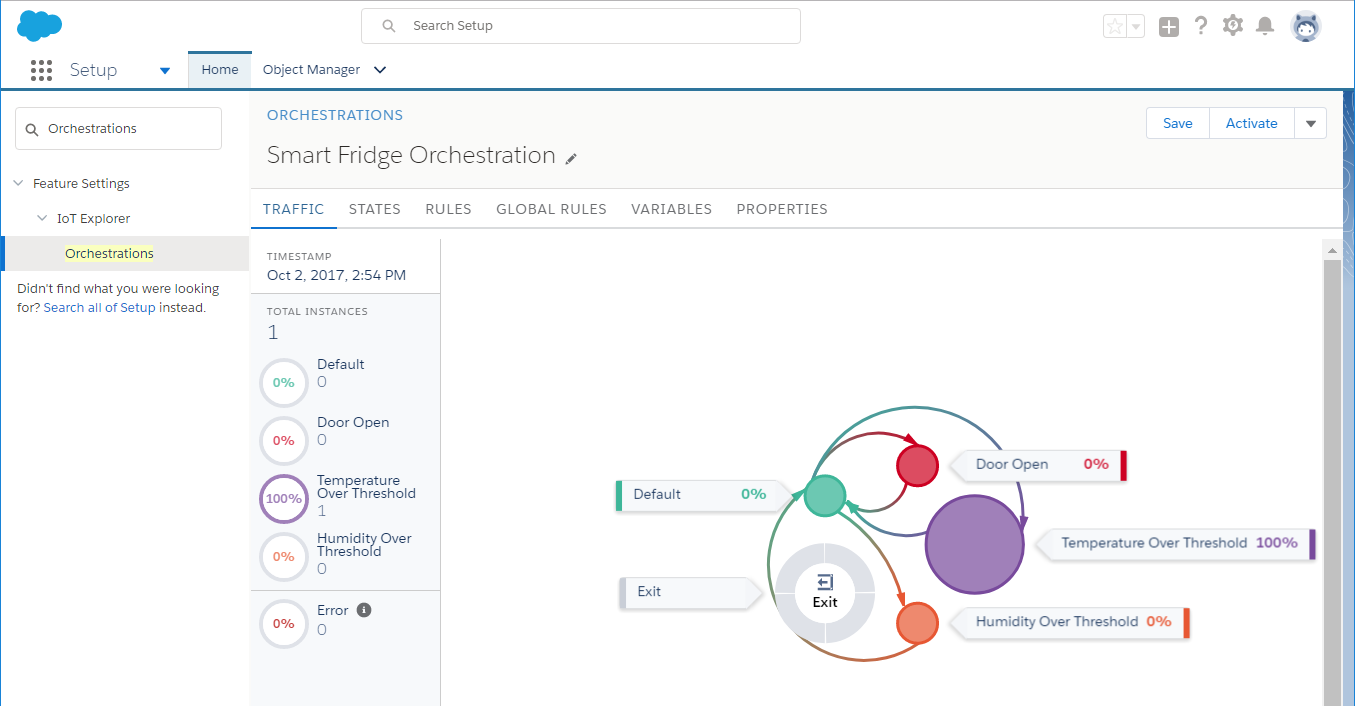
- Move the impExplorer to a warm dark place. On the Traffic tab, you should see that your device has now moved into the Temperature Over Threshold state:
- Run in the Salesforce mobile app as described in Step 12.
- Click the hamburger menu in the upper left to open the navigation panel.
- Under the Recent section, click Cases:

- You will see the registered Cases:

Note The Orchestration Traffic view is on a seven-second refresh, but Platform Events are processed as they are received. This means you may see the Case created before the UI refreshes.
Congratulations! You’ve completed the first Salesforce IoT Trailhead project. If you’d like to carry your project forward and learn more about developing applications on the Electric Imp platform, you can check out our series of nine examples Introducing Squirrel Applications. These examples build up skills on core Electric Imp development concepts, including creating battery- efficient applications, integrating with external web services, and culminate in building the Salesforce Smart Fridge Application Code.