How To Connect The impExlorer Kit To Losant
Build A Simple IoT Application With Electric Imp Hardware And The Losant Application Enablement Platform
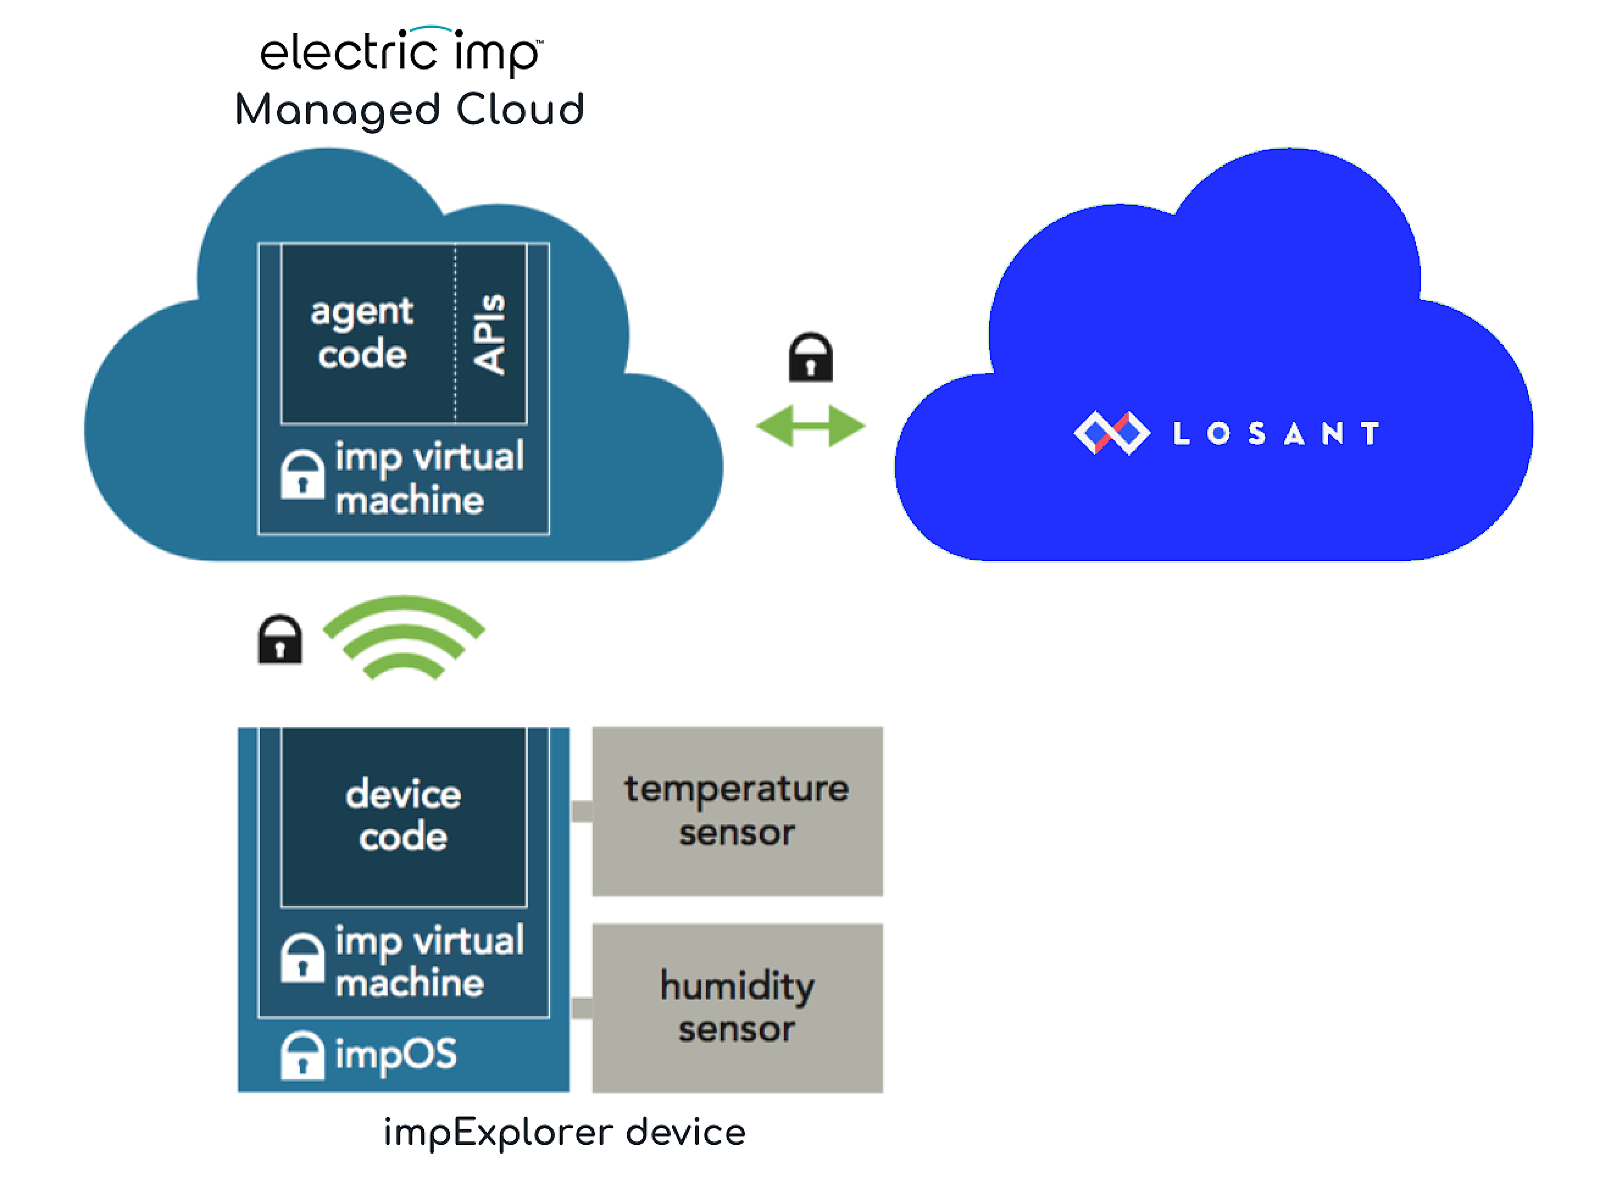
Electric Imp’s impExplorer™ Kit features on-board temperature, humidity and pressure sensors. Those values can be read and sent to Losant, an application enablement platform which provides components and tools that allow you to build end-user IoT applications. You can create dashboards, APIs, web pages and full-blown user experiences directly from within the platform.
In this tutorial, we’ll configure the impExplorer to read sensor data and periodically send that data to its agent, which is a virtual device twin in the cloud. Every device on the Electric Imp Platform has its own, unique agent, which mediates all communications between device and the wider Internet, keeping the device secure. When it receives sensor data from the device, your impExplorer’s agent will forward that data to Losant using Electric Imp’s Losant integration.
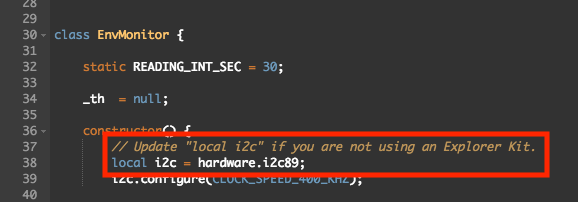
Note If you’d like to try this tutorial with a different imp-enabled device, you’ll need to modify the device code’s i2c variable in the EnvMonitor class constructor to match the I²C bus used on your hardware:
What You Need
- An Electric Imp impExplorer Kit.
- An Electric Imp account.
- A Losant account.
- Your 2.4GHz 802.11bgn WiFi network name (SSID) and password.
- A laptop or desktop computer.
- An Android or iOS mobile phone or tablet.
What To Do
- Get your impExplorer online. For this, you will need the free Electric Imp app, which is available for Android and iOS.
- Download and run the app on your mobile device, and sign in with your Electric Imp account credentials.
- Tap Configure a Device then select Wireless as your connection option. Now enter your WiFi network’s details. Its name (SSID) may be pre-set to the network your phone is connected to, though this may not be a network with which the impExplorer is compatible, so make sure you have the correct one: a 2.4GHz 802.11n network.
- Power up the impExplorer with the supplied cable and a spare USB port on your computer or a USB AC adaptor (recommended).
- Tap NEXT in the App until you see the BLINKUP screen.
- Tap START BLINKUP and quickly place the phone face down on top of the impExplorer:

- When configuration is done, the phone will vibrate. You can remove it now and watch the impExplorer connect. You’ll know when it’s done so: the imp001 card in the impExplorer will flash green:

- If the impExplorer doesn't flash green, just try again. Make sure the phone is not too far away from the impExplorer and that you enter the network SSID and password correctly. If the impExplorer’s light goes out, this is normal; just remove and restore the power to get it flashing again. When it’s flashing, it’s ready to be configured.
- If you’re still having problems connecting the impExplorer, check out our Troubleshooting Guide for some useful hints and tips to help you out.
- Program the impExplorer. The code you'll need is listed at the end of this tutorial.
- Open a new window or new tab in your browser.
- Sign in to your Electric Imp account.
- Click the Create New Product button — impCentral will guide you through the creation of a new Product and a Development Device Group.
- Products are how impCentral organizes projects.
- Device Groups help you organize devices that belong to a given Product.
- Device Groups have a type based on the role the devices they contain perform. In this case, they're for development, but you might also have production and factory devices too.
- Having created the Device Group, you'll be taken to impCentral’s code editor. It’s here that you write software and deploy it to the devices in that group:
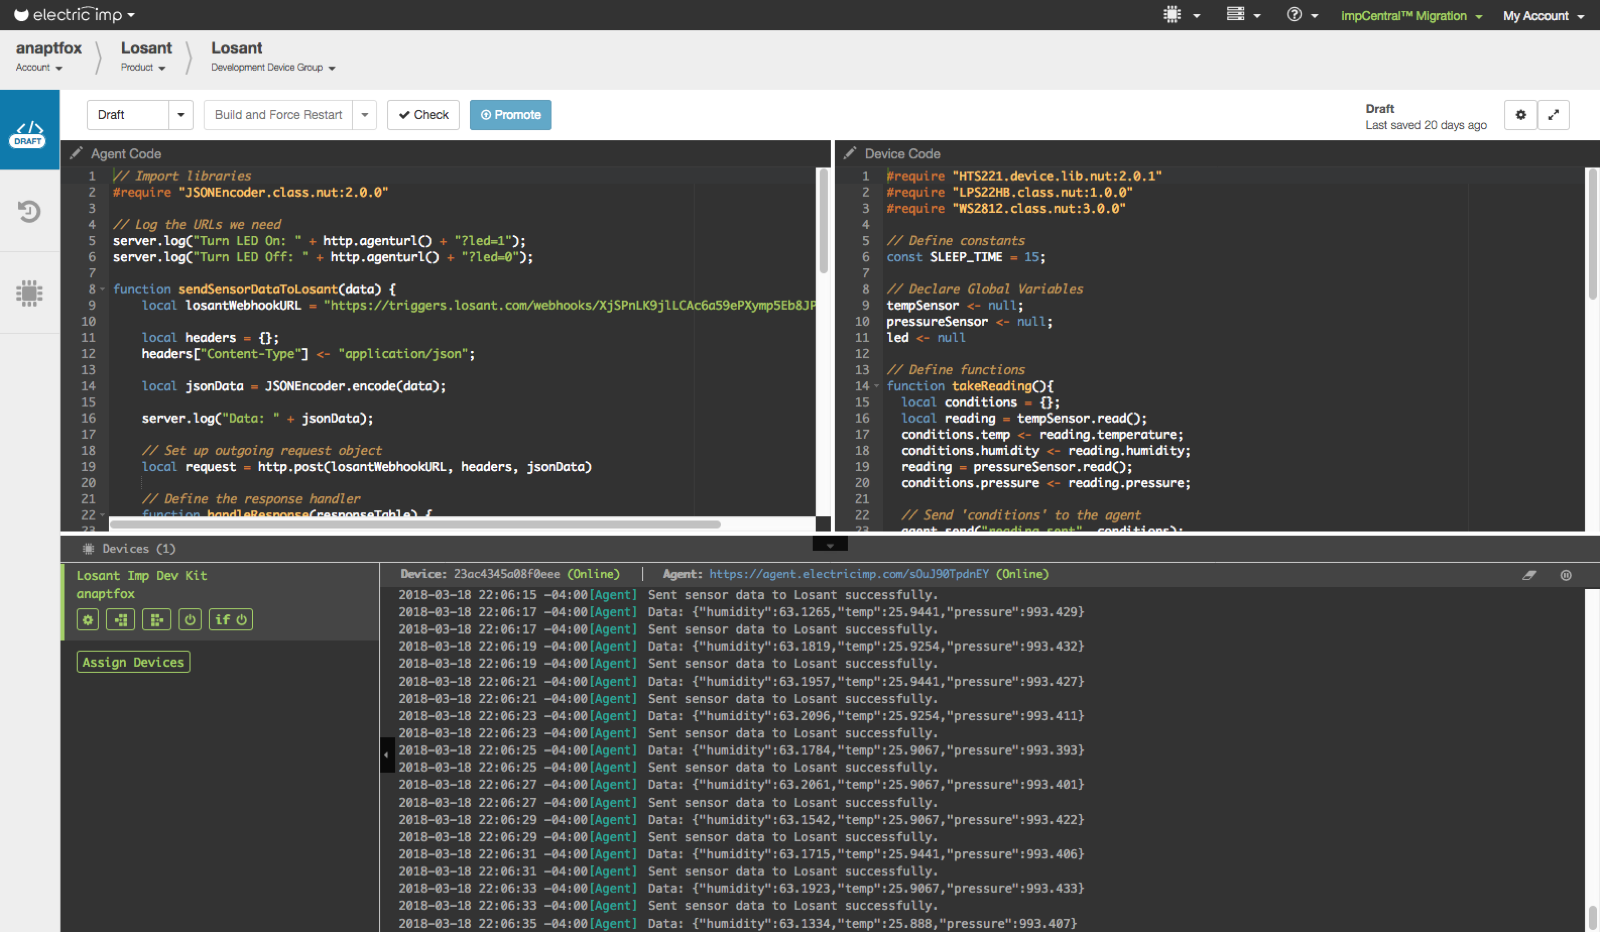
- Paste the device code into the right-hand pane (Device Code) in the impCentral code editor.
- Paste the agent code into the left-hand pane (Agent Code) in the impCentral code editor.
- Do not close the impCentral window — instead, open a new browser tab.
- Sign in to your Losant account in a browser.
- Create an Application:
- In the Losant Applications menu, click the + New Application button:

- Give the new application a name:

- Click the Create Application button.
- In the Losant Applications menu, click the + New Application button:
- Connect your device to Losant:
- At the top right of the application page (the left-most tab in the Losant screen) locate your unique Application ID and copy it:

- Switch back to the impCentral code editor and within the agent code locate the LOSANT_APPLICATION_ID constant. Paste the Application ID you copied into the space provided between the quote marks in the agent code. Make sure you completely overwrite the
<YOUR_APPLICATION_TOKEN>text: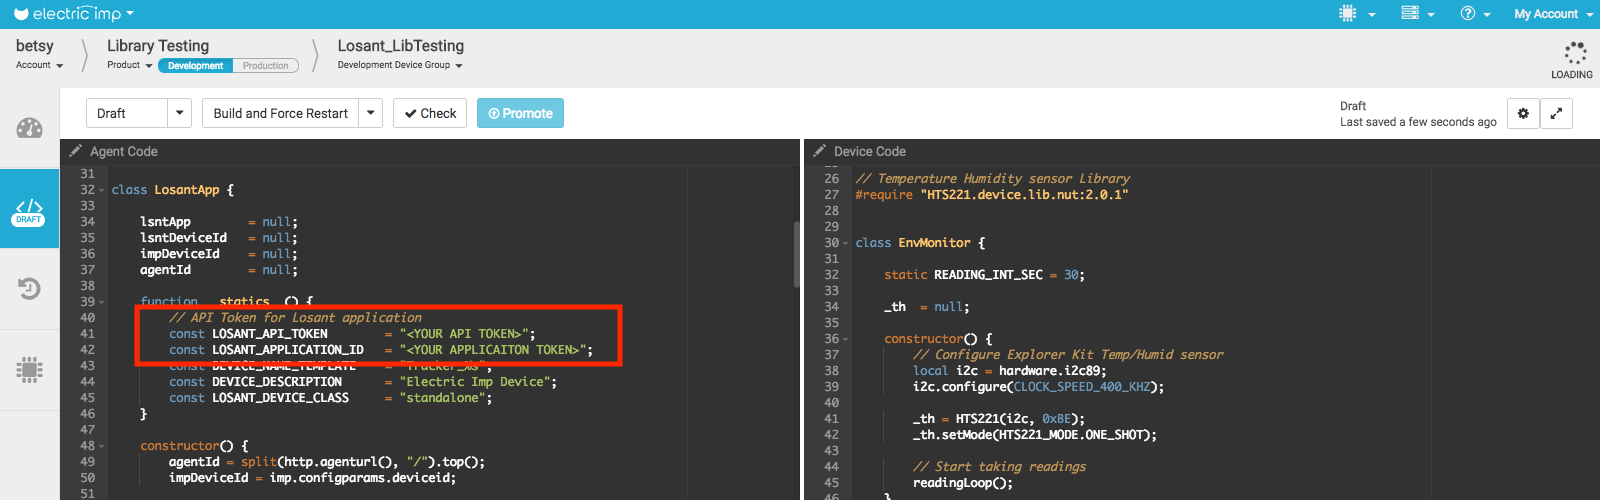
- Navigate back to your Losant browser tab and click on the Security tab:
- Select APPLICATION API TOKENS from the sidebar on the left and click the + Add Application Token button:

- Give the token a name and click Create Application Token:

- Copy the API token from the pop-up window. Do not dismiss this window until after the token is saved in the code editor:

- Navigate back to the impCentral code editor and and in the agent code locate the LOSANT_API_TOKEN constant. Paste the API token into the into the space provided between the quote marks in the agent code. Make sure you completely overwrite the
<YOUR_API_TOKEN>text: - Click the Build and Force Restart button to save and launch the code.
- Navigate back to Losant, click the I have copied my application token to a safe place checkbox in the pop-up, and click Close Window.
- In the Applications nav bar, select your Application name (the first tab on the left):

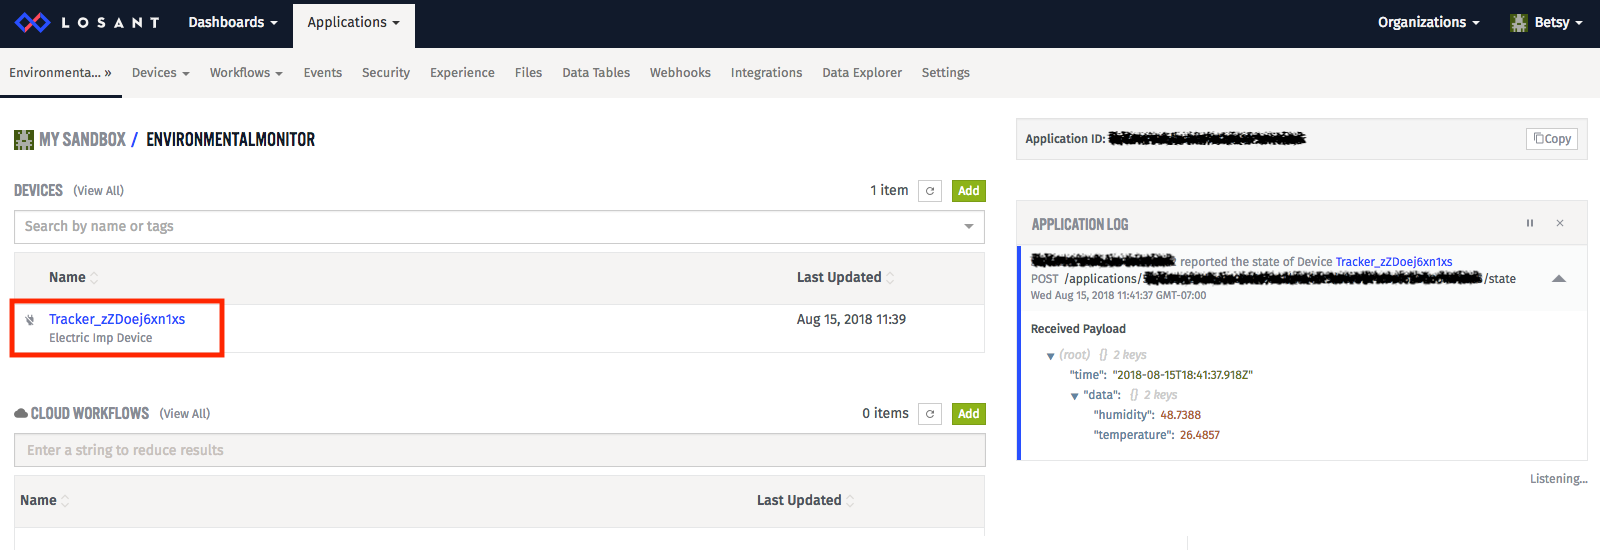
- Your device should now appear under the Devices section. Make a note of the device name:
- At the top right of the application page (the left-most tab in the Losant screen) locate your unique Application ID and copy it:
- Create a Losant dashboard:
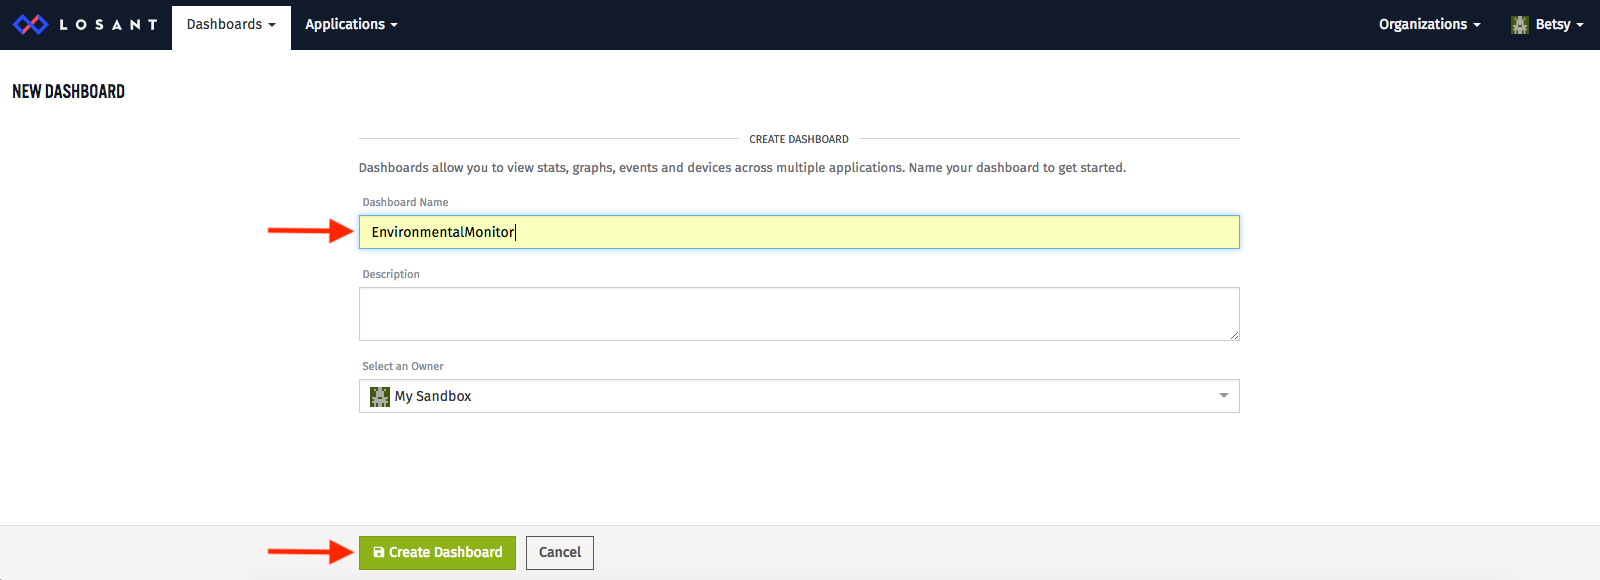
- Under the Dashboard tab click the + Create Dashboard button:

- Give the dashboard a name and click Create Dashboard:
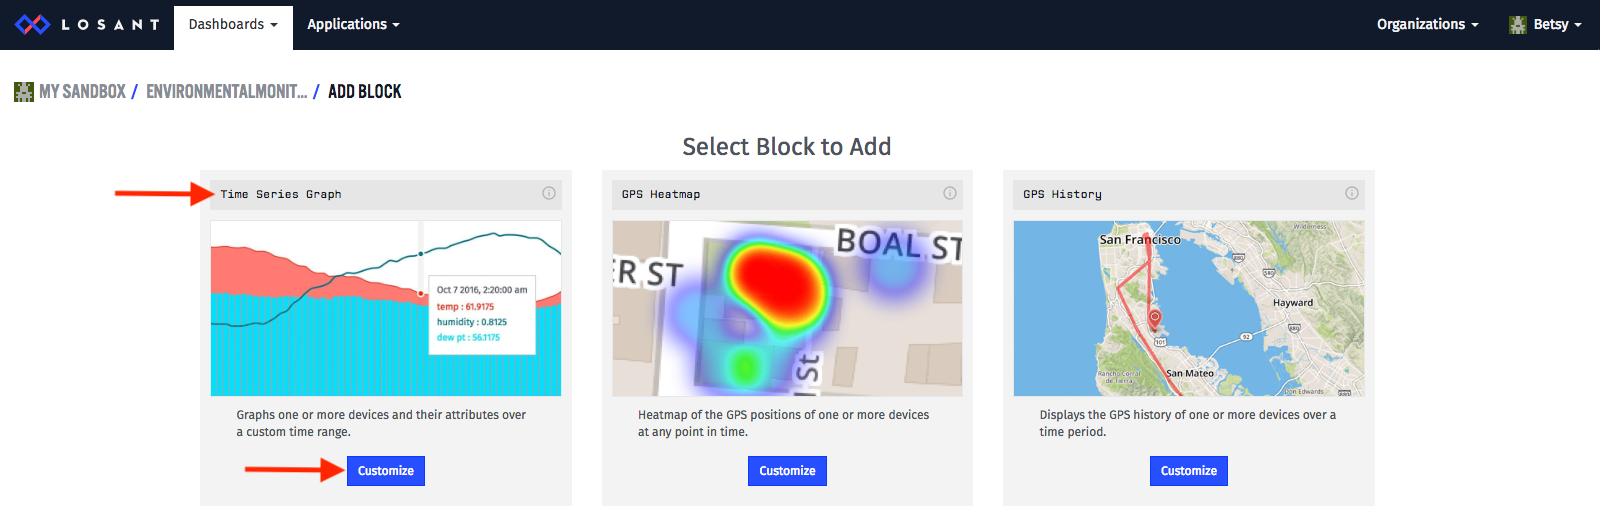
- Add a Time Series Graph by clicking the Customize button in that block:
- In the Select Application section of the Choose an Application dropdown make sure your Losant application is selected.
- In the DATA TYPE section select Live Stream:
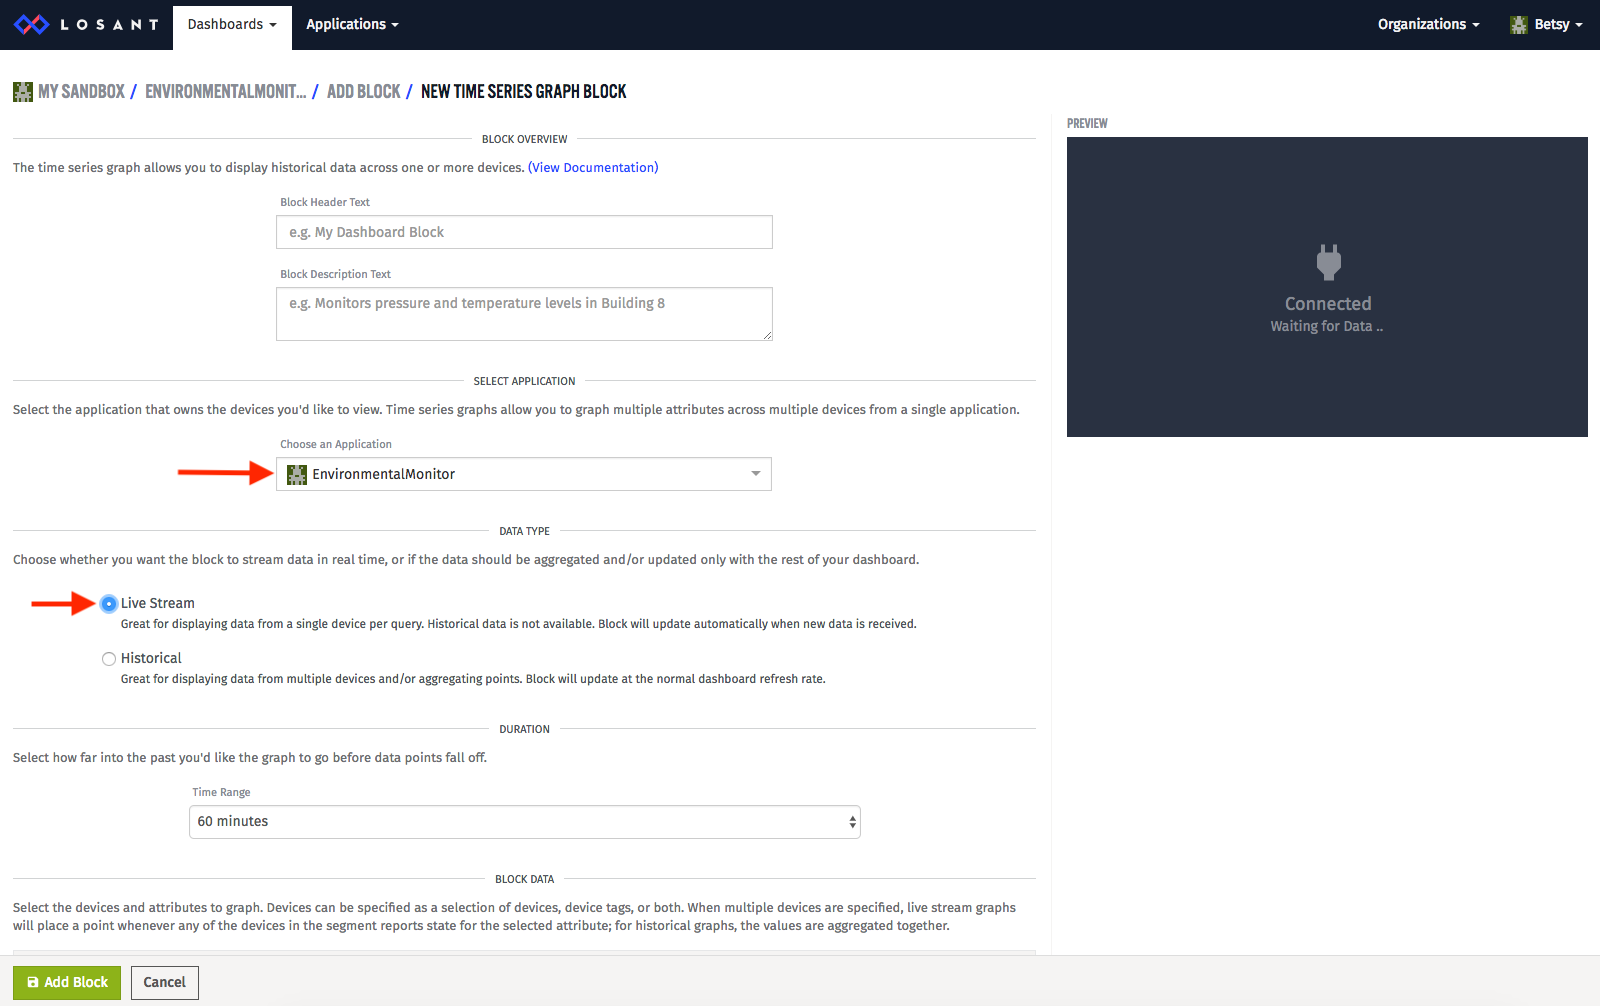
- Scroll down to the BLOCK DATA section and
- Your device should already be added to the Device IDs/Tags. If it isn’t, select your device by name.
- In the Attribute dropdown select temperature.
- Set the Series Label to
Temperature. - Click the Add Segment button:

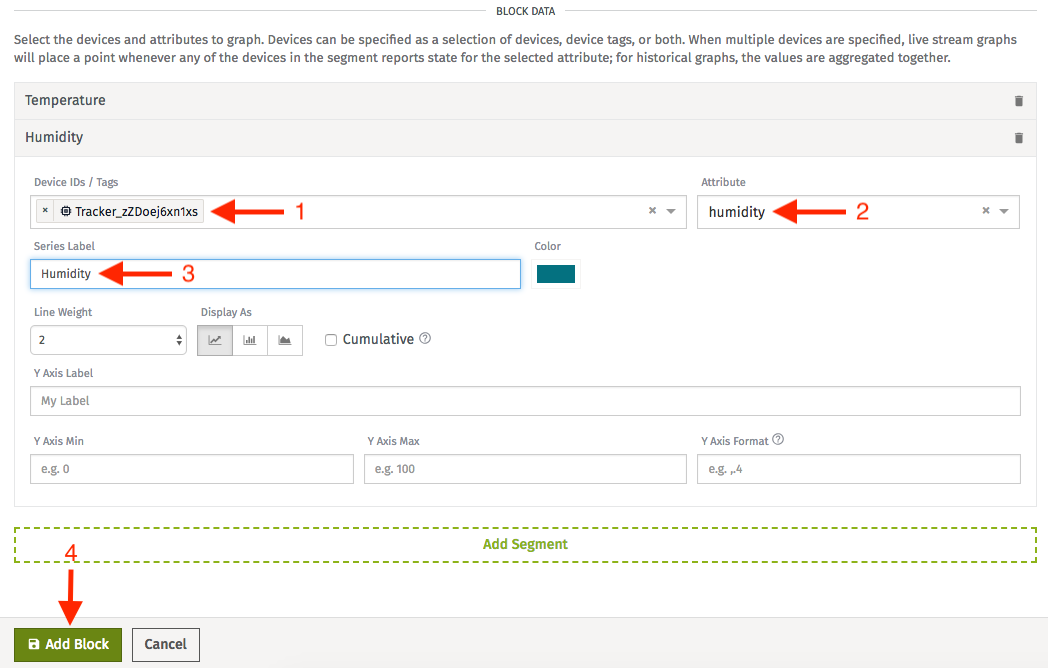
- Now add a Segment for humidity data:
- In the Device IDs/Tags dropdown select your device.
- In the Attribute dropdown select humidity.
- Set the Series Label to
Humidity. - Click the Add Block button:
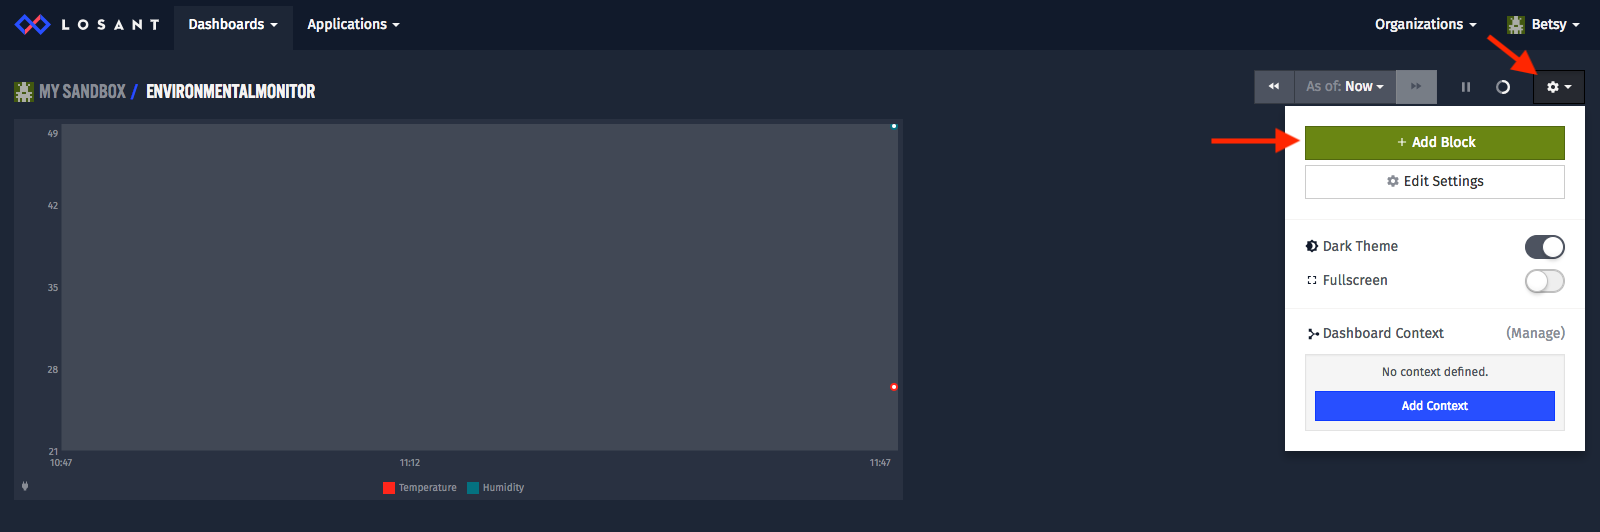
- Click the gear icon at the top right of the dashboard.
- Click the + Add Block button:
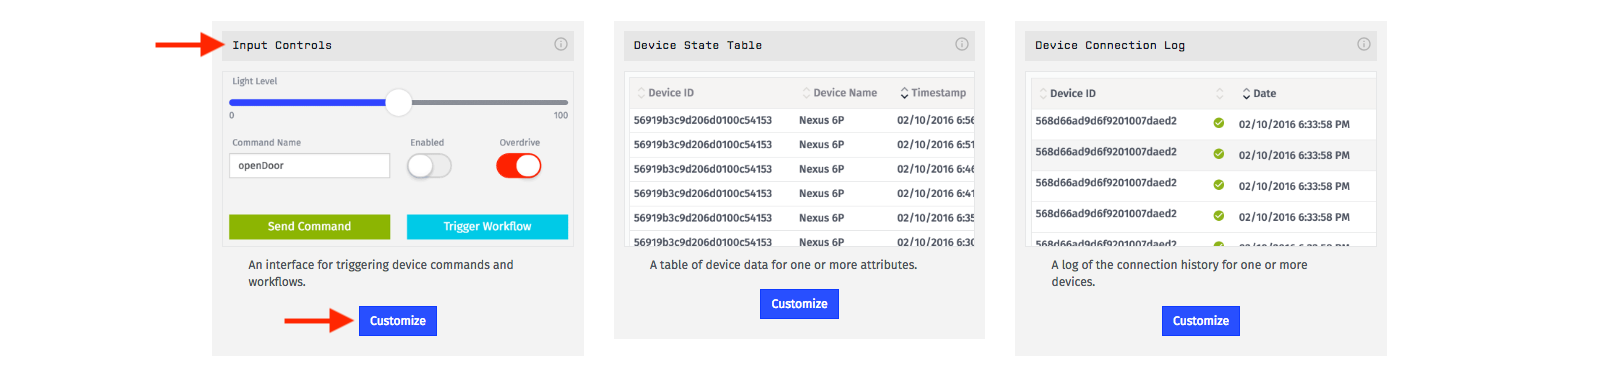
- Scroll down to locate the Input Controls block and click Customize:
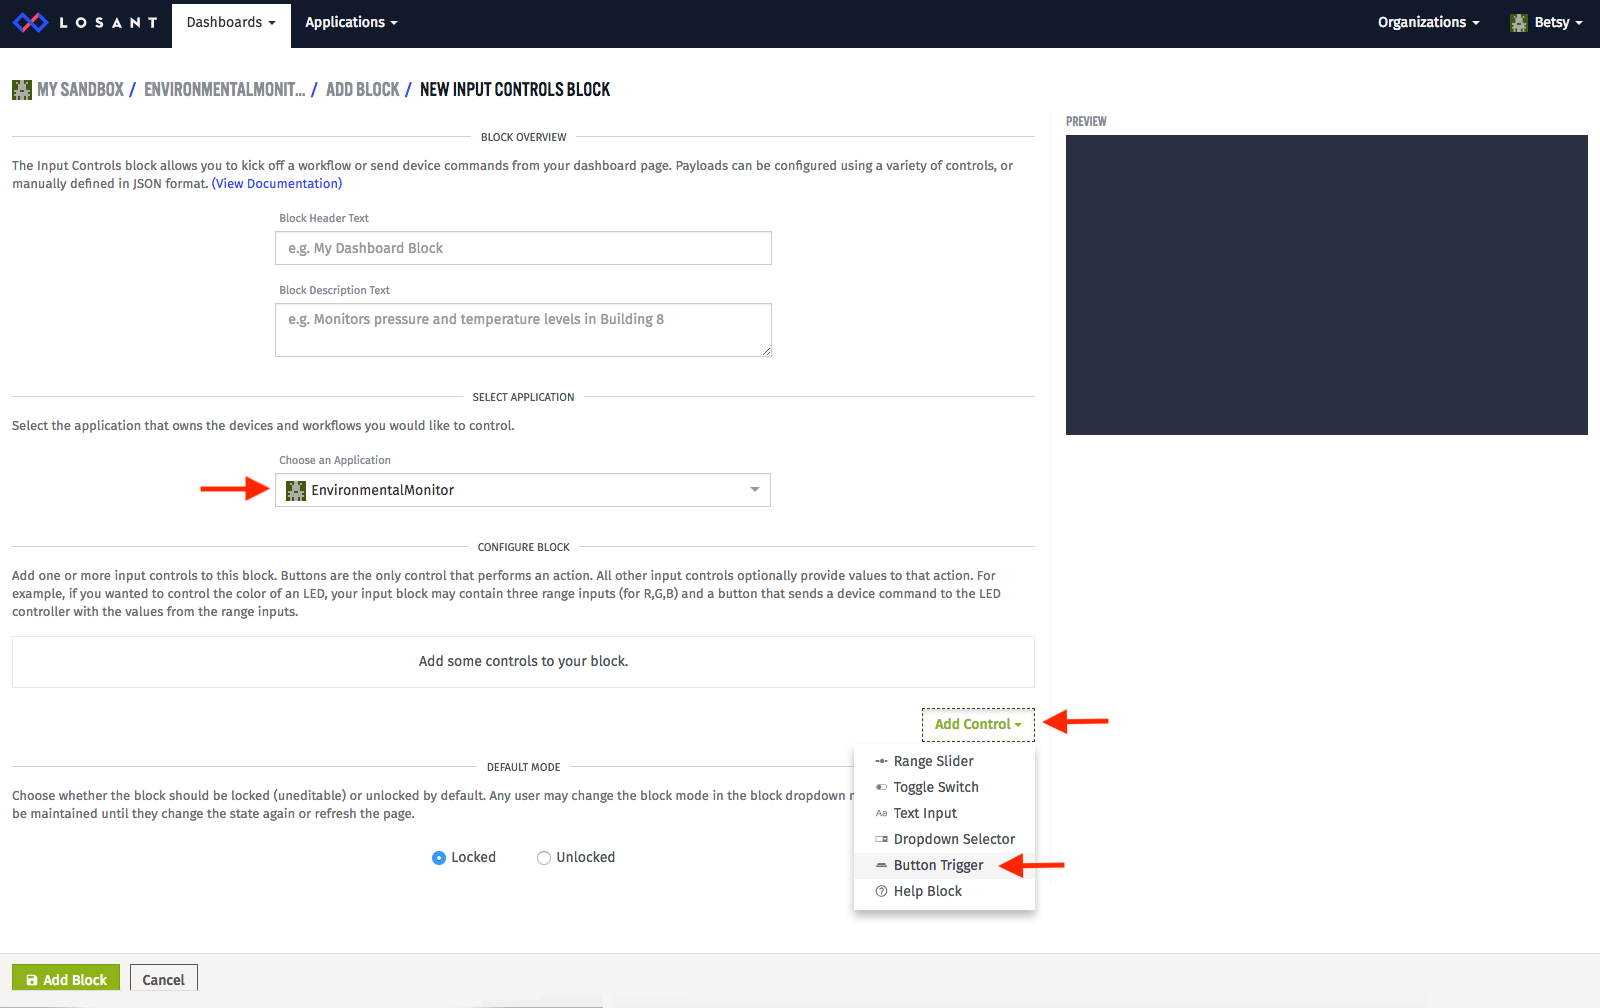
- In the Select Application section of the Choose an Application dropdown make sure your Losant application is selected.
- Scroll down to the CONFIGURE BLOCK section and click Add Control.
- Select Button Trigger from the dropdown:
- In the CONFIGURE BLOCK section:
- Update the label to
Send Device Command - Under On Click... make sure Send Device Command is selected.
- In the Device IDs/Tags dropdown select your device.
- Under Command Name give your command a name, eg
test. - In Payload write a message like
"Sending test message":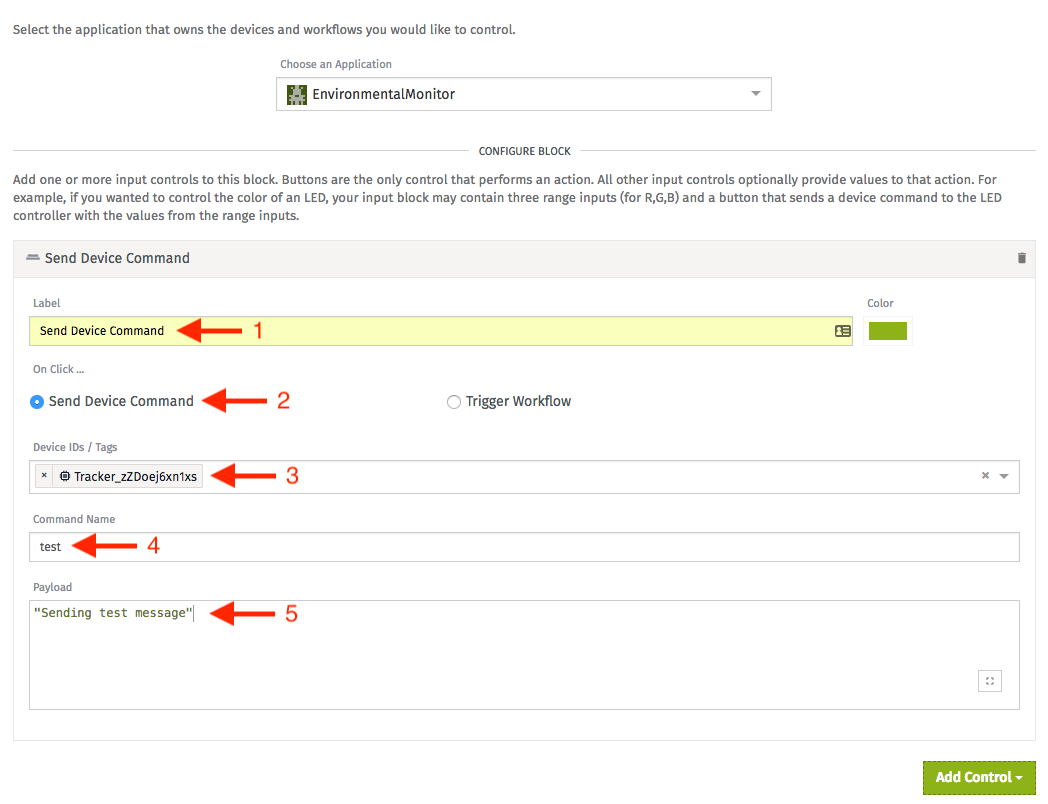
- Update the label to
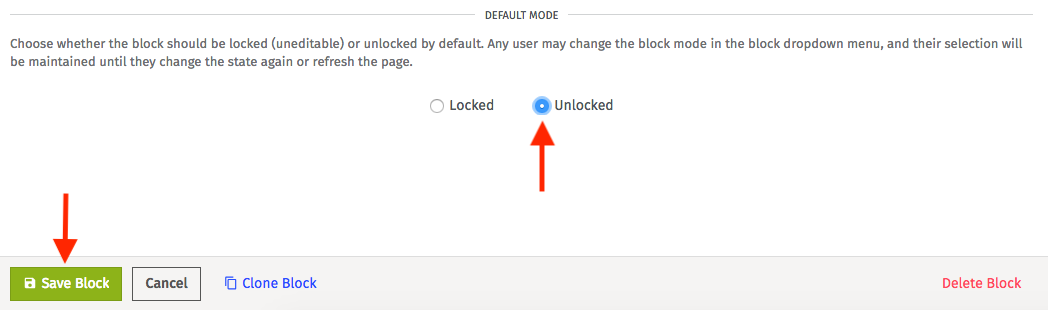
- In the DEFAULT MODE section select Unlock.
- Click the Add Block button:
- Under the Dashboard tab click the + Create Dashboard button:
- Send a command to your device:
- In the dashboard click the Send Device Command button:

- Navigate back to the impCentral code editor and view the logs. Each time the button is clicked in the dashboard a log with the command name and message should be logged:

- In the dashboard click the Send Device Command button:
What The Code Does
The device code is simply reading the temperature, humidity and pressure using the impExplorer’s on-board sensors. It then sends the readings to its agent. This process occurs once every second.
The “sending” happens on this line:
agent.send("send.reading", result);
The agent code listens for sensor readings using this line:
device.on("send.reading", app.sendData.bindenv(app));
When readings arrive, it sends them to Losant via an HTTP POST request. This is done in the sendData() function.
Simultaneously, the agent is listening for commands from the Losant dashboard:
openCommandListener();
This registers a number of functions that will be called when the Losant library receives a message from the dashboard. The function _commandHandler() is called and this just logs that the command has been received.
The Code
Here is the code you need for your impExplorer (the device code) and its online partner, the agent. Just copy and paste each listing into the relevant pane within impCentral’s code editor.