Agents and Internet Interactivity
Remotely control your Fieldbus Gateway’s LEDs
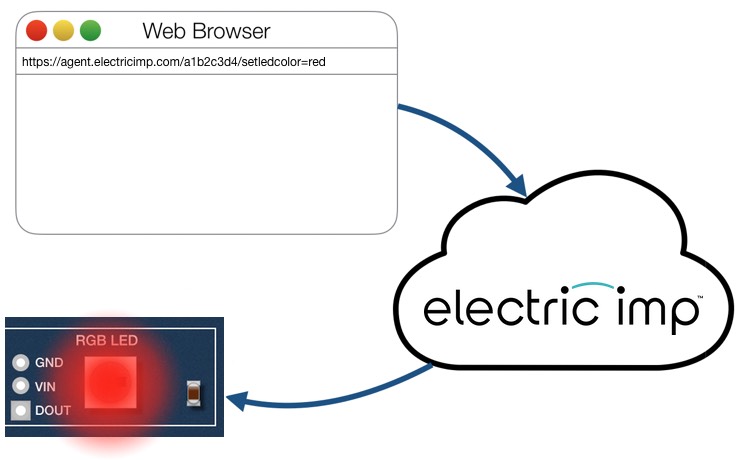
Controlling a device you have in front of you is all very well, but the Electric Imp Platform enables connected devices. How then do you take advantage of it to control your impAccelerator™ Fieldbus Gateway remotely? To do so, you need to make use of Electric Imp’s agent technology.
Every device has an agent dedicated to it. Agents are micro-servers that operate as a mediator between the device and Internet-connected resources. For example, you might program the agent to receive commands from a mobile app and relay those commands to the device. In response, the device might ask the agent to fetch it information, such as a weather forecast, from an online service. The agent handles the outgoing request and, when the data comes back, sends the appropriate part to the device, which might then put an appropriate icon on a screen or light an RGB LED a certain color.
Agents allow you to control your device from a browser
Agents run continually, allowing devices to be accessible even if they have been temporarily disconnected — for example, it is being moved by its owner from one room to another, or it is in deep sleep mode to conserve battery power.
Being server-based, the agent has access to more processing horsepower than the device does, so you can offload number-crunching tasks to the agent and leave the device to focus on what it does best: handling input and output. This can be particularly important when the device is battery powered.
Finally, there’s security. Thanks to its agent, the device itself doesn’t need a visible presence on the Internet so it’s not exposed to attacks. In fact, it’s impossible to communicate with a device directly, even on the local network. All communication must be routed via its agent. If anything happens to an agent, its device will continue to operate. Agents are insulated from each other.
Of course, if agent and device are separate — one in the cloud, the other in your office or lab, or in an end-user’s premises — the two need a comprehensive messaging system to allow them to communicate with each other. We’ll explore this mechanism, and how agents operate, in this tutorial, which makes the “Hello, World” LED seen in the last section remotely controllable.
1. Set up the Fieldbus Gateway
Power up your Fieldbus Gateway so that it connects to the Internet. If you haven’t configured your Fieldbus Gateway for Internet access yet, the BlinkUp section will show you how.
2. Open impCentral
If you’ve just completed the previous section of this guide, you’ll have impCentral open on your computer. If not, load it up now and sign in using the account log-in details you created earlier.
Locate the Connected Product Product and its Test Hardware Development Device Group that you created in the previous section:
- Click Account in the nav var.
- Select your personal account.
- Find Connected Product in the Products list.
- Click Development Zone in the MANAGE column.
- Find Test Hardware in the Development Device Groups list.
- Click Code in the MANAGE column.
impCentral’s code editor will now appear.
3. Program Your Device and its Agent
Here is the code you’ll need to run the example. This time there are two parts: as before there’s some code for the device, but we now have some code for the agent too. Copy the two code listings below, making sure you paste each one into the correct part of the impCentral code editor.
Device Code
Agent Code
What the Code Does
Let’s look at the device code first. The key line is the last one; the others simply configure pins as DIGITAL_OUTPUT to drive the three application LEDs, just as we did in the previous section. This time, however, we don’t run a loop to switch an LED on and off, we only change its state in response to a message from the agent. The last line of the code tells the device to run the LED switch code, embodied in the function setLed(), whenever it receives the message string "set.led" from the agent:
agent.on("set.led", setLed);
This is another example of the Electric Imp Platform’s event-driven nature. When the device reaches this line of code, it records the fact it needs to trigger the function setLed() ‘on’ receipt of a "set.led" message from the agent. It doesn’t call setLed() at this point; instead the program ends. The device will take no further action until such a message arrives, in which case the function setLed() will be called. Remember, the method takes a reference to the function to be called, so we don’t include brackets after the function name (this would call the function immediately and pass into the method the value returned by the function).
This is a powerful approach. It saves you the programmer from constantly checking for incoming messages and, if there are any, whether they’re the ones you’re interested in. impOS™ does all that for you, and runs the correct response code, all with the single line above.
But how does the agent send a message to the device? Look at line 17 in the agent code:
device.send("set.led", led);
This sends the message "set.led" (the device.send() method’s first parameter) to the agent’s paired device (represented by the device object) and packages it with the data value stored in the variable led. We’ll see how led is set in a moment: for now, let’s see what the device does with it. Look at the function declaration at line 14 of the device code. The function turns off all the LEDs and then turns on the LED indicated by the value of the local variable activeLed. The pairing of device.send() and agent.on() always includes a single data variable which impOS automatically forwards to the function it has been told to call in response to the arrival of a specifically named message. Here, this data is placed into activeLed. It’s going to be the string "red", "yellow" or "green".
The agent demonstrates a second example of event-driven programming, in line 30:
http.onrequest(requestHandler);
Just like agent.on(), http.onrequest() registers a function that the agent will call if a certain event takes place, in this case the receipt of an HTTP request issued by a web browser. When such a request is made, the agent runs the function requestHandler(). Data is packaged up and passed to this function as parameters: an httprequest object which records the incoming request, and an automatically generated httpresponse object which the agent can use to acknowledge receipt of the request (line 23) or, if an error has occurred, return a suitable warning (line 25).
Both httprequest and httpresponse are objects defined by the imp API. If you look at the function requestHandler() you’ll see we examine the query property of the httprequest request to see if it is one we need to respond to here. If query should contain the property led (?led= in the browser command), the code checks whether its associated value matches one of the three permitted strings by iterating through the contents of the array variable leds. Each pass through the foreach loop (a useful Squirrel structure), the variable aled takes the value of one of the entries in leds. If the current value of aled matches the value of the query property led (we convert the input string to lower case first) then the string is sent to the device to identify the required LED.
More generally, the query property contains any and all URL-encoded keys and values sent as part of the initial HTTP request. These values are accessed through their keys, which are presented as properties of query using dot syntax.
Whether query contains led or not — it could contain any of a number of parameters we may or may not be interested in — we use the httpresponse object response to send the standard HTTP response code 200 back to the browser that issued the request:
response.send(200, "OK");
4. Test the Application
Click on impCentral’s Build and Force Restart button. This will save the agent and device code in the Electric Imp impCloud™, and install both parts. If you typed in the code rather than pasting it and you made a mistake, impCentral will flag up an error it’s a matter of incorrect syntax. If the error can only be detected when the code is running, you’ll see it reported in the log.
As the device starts up, you’ll see an entry like this appear in the log:
[Status] Downloading new code; 0.37% program storage used
As the agent starts up, you’ll see something like the following lines logged:
[Agent] Control LEDs with https://agent.electricimp.com/AbCdEfGh123?led=<red/yellow/green>
These are in response to the first line of the agent code. These make use of the imp API method http.agenturl(). It returns the agent’s Internet address. Each agent URL is unique so you’ll see a different string of characters before the ? in the lines above. Copy the first URL from your log, ie. your equivalent of:
https://agent.electricimp.com/AbCdEfGh123?led=red
Now paste it into a new browser window’s address field. Hit the Return key on your keyboard and... your Fieldbus Gateway’s red LED should turn on. Make sure you copy the line from the impCentral log, not this guide.
You have connected your Fieldbus Gateway to the Internet and controlled it remotely. Delete red and replace it with green in the browser address field, press Return. The red LED will now turn off and the green LED will light instead. With the URL, you can control the active LED from any Internet-connected device that can run a browser: your office computer, your tablet, your phone, a computer in an Internet cafe, or even other people’s devices.
Where Next?
This is a simple example. With suitable code, your agent can interpret much more complex HTTP requests combining multiple commands relevant to the device, which may include displays, sensors, control motors and more. You can write complex REST APIs served by the agent through which mobile apps can interact with your device.
Now that you understand the fundamental structure of an Electric Imp application, you’re ready to go out and start building your own devices and writing the code that will bring them to life.
Further Reading
- There are specific examples of Internet-Agent-Device interaction in our imp API Cookbook
- Effective Internet-agent-device Communication — How imp-enabled devices interact with the outside world
- Event-Driven Programming — Understand the imp application architecture