Ready-to-Run Code Libraries
Now you understand that there are two parts to each imp application — the agent code and the device code — you’re ready to develop your own application. However, you might very well be wondering how you’re going to come up with all the code you need: the software the runs in the cloud and connects your application to services such as Azure, AWS, PubNub and Twitter, and the code that runs on your device that communicates with the peripherals you want to build into your hardware, such as LEDs, LCDs, sensors and actuators.
The good news is that much of this code has already been written for you. Better still, it’s really easy to incorporate this existing software into your own.
Electric Imp maintains a library of Squirrel classes — templates for objects which represent anything from a web service to a hardware add-on — any of which you can include in your code with a single instruction.
Twitter Activity Light
Let’s say you’ve decided to upgrade the device you built in the previous section. Instead of a plain, red LED, you want to use a WS2812, a multi-color LED, also known as a NeoPixel*, that you can control to generate some amazing lighting effects. And maybe you want it to demonstrate those effects when someone posts a Tweet containing a specific word or phrase.
It sounds complex, doesn’t it? You have to go and learn how both WS2812 LEDs and Twitter work so that you can write driver code to interact with them. Then you have to write the code that ties each driver into, respectively, the device and the agent, and handles communication between these two halves of your application.
Fortunately, you only need do a fraction of that, and it’s all thanks to libraries.
1. Assemble the Hardware
To build this circuit you’ll need some wires and a WS2812. These are easiest to use when they’re pre-mounted on a board likes this one from Adafruit or in singles, like this. Either will require you to solder connector wires to the back of the board. If you use wires with female connectors, you can strip one end of each to solder to the WS2812 board and then just clip the other end onto a Developer Kit connector.
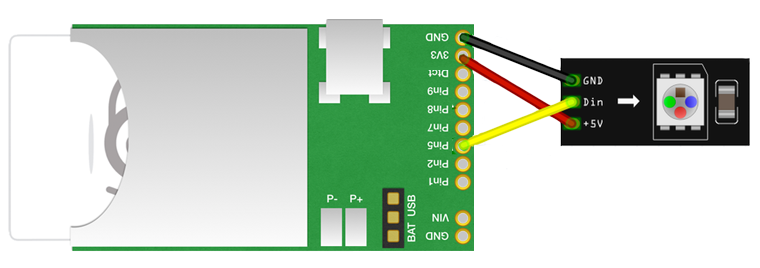
This is the circuit you’ll make:

For simplicity, we’ve omitted the level shifter usually placed between the 3.3V breakout board and the 5V WS2812. The board’s voltage tolerances mean this omission shouldn’t matter in this basic example, but for a product using WS2812 LEDs, you should manage voltages correctly.
2. Open impCentral
If you’ve just completed the previous section of this guide, you’ll have impCentral open on your computer. If not, load it up now and sign in using the account log-in details you created earlier.
Locate the Connected Product Product and its Test Hardware Development Device Group that you created earlier:
- Click Account in the nav var.
- Select your personal account.
- Find Connected Product in the Products list.
- Click Development Zone in the MANAGE column.
- Find Test Hardware in the Development Device Groups list.
- Click Code in the MANAGE column.
impCentral’s code editor will now appear.
3. Program Your Device and its Agent
Here is the code you’ll need to run the example — just replace any code you’ve already keyed in. Again there are two parts: code for the device, and code for the agent. Copy the two code listings below, making sure you paste each one into the relevant part of the code editor. If you’re not sure which part of impCentral is which, refresh your memory here.
Device Code
Agent Code
What the Code Does
Let’s look at the device code first. The first line is the important one: it uses the directive #require to load in a library, in this case the WS2812 library, WS2812.class.nut. You can see the library’s name in between the double-quote marks, along with the version number and a colon to separate the two. This formatting is important: you must include both the full library name and the version number you want, and you must separate these two bits of information with a colon and wrap them all in double-quotes. Don’t place a semi-colon after the directive.
The body of the device code follows — and must follow — any #require statements you include. First we declare some variables, local to the main body of the program so therefore accessible from all all parts of it. This is an alternative to the global declarations we used on previous pages of the Guide. All Squirrel variables that aren’t defined as globals must be declared as local to their context, using the local keyword. Next we configure an SPI bus and create a new WS2812 object, light, using the Squirrel class embodied in the library.
We now have a series of functions that, in response to a message from the agent, presents a lighting effects on the WS2812. Finally, we then tell the device to look out for messages from the agent that signal a new Tweet.
How do we know how to create the WS2812 object? For that we need to examine the documentation for the library code itself. This documentation tells us how to instantiate any WS2812 objects we need and what methods these objects provide for us to control the LED. The documentation for the WS2812 class can be found here — follow the link now (it will open in a new window). As you can see, you create a new WS2812 object with the class’ constructor, a function that takes some information about the your physical set-up and returns a new WS2812 object.
In our code, we pass an SPI bus object — which we configure first, in the previous line — and the number of WS2812s we have (one in this case). The documentation tells you that you set the WS2812’s color by calling the method set() and that, having done so, we send the color data out to the device by calling draw(). We use these methods in the code’s glowinit() and glow() functions. glowinit() sets up the lighting effect and is called when the agent signals the arrival of a suitable Tweet. We establish a three-minute timer so that the WS2812 doesn’t stay on forever. Next, glow() runs the animation, and adjustColors() modifies the color values to generate the effect.
Now you understand how libraries are included in code, you know what happens in the agent. Once again, we include a library — the Twitter library — at the start of the program. Don’t forget, it has to go right at the top — you can’t include libraries further on in the code or they‘ll be ignored. We also make sure the #require statement provides all the information the code compiler needs: the full library name and the version number.
The agent uses the Twitter library to establish a Twitter object which we configure with access credentials (see below) and set it to watch out for a specific text string (line 9). This scan happens automatically; when someone Tweets the watched-for word, the agent sends a message to the device. We’ve already seen how this triggers the device to light up the WS2812.
4. Run the Code
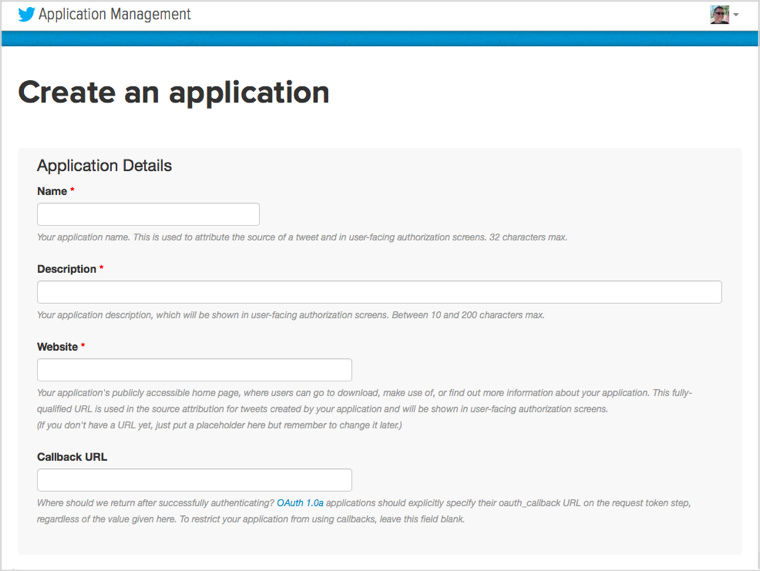
To try this for yourself, you’ll need to visit Twitter and sign up as an application developer. Go to the Twitter website and sign in using your own Twitter account. If you don’t have a Twitter account yet, you’ll need to set one up now. When you’ve signed in, go to the site’s apps section. Here you’ll need to click on the Create New App button and provide the information Twitter requests:

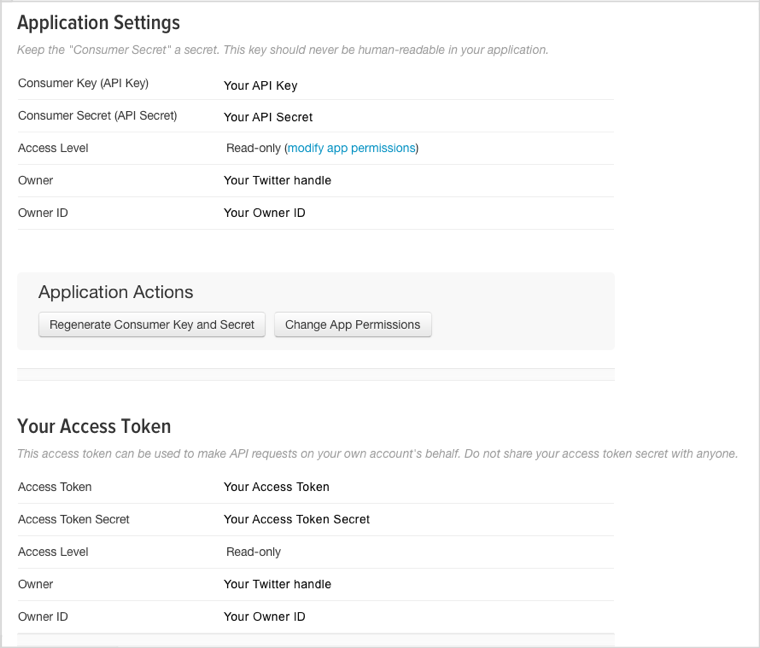
This process is designed for app developers who want to embed a Twitter feed into their own code. Although we’re not developing an app here, we’ll use the same approach. When you’ve set up your app, look for the Keys and Access Token tab. Here you’ll find the four codes — Consumer Key (API Key), Consumer Key Secret (API Secret), Access Token and Access Token Secret — that you’ll need to copy into the agent code.

Select these four values one at a time and paste them into the agent code where you see them (line 4). Now click Build and Force Restart in the impCentral code editor — and watch your WS2812!
Where Next?
To find out all the libraries that we currently offer — the list is always growing — visit the Libraries page. It also includes more information on including libraries in your code, and some troubleshooting guidance.
To find out where to go next as an Electric Imp Developer, take a look here.
*‘NeoPixel’ is a trademark of Adafruit Industries, LLC.